Red Velvet Brownies: Fudgy with Cream Cheese Frosting
- Time:15 minutes active + 25 minutes baking = Total 40 minutes
- Flavor/Texture Hook: Fudgy, velvety centers with a tangy cream cheese finish
- Perfect for: Valentine's Day, decadent dessert platters, or advanced beginners
- Perfect Fudgy Red Velvet Brownies
- Essential Baking Techniques
- Detailed Recipe Specs
- Ingredient Depth Analysis
- Required Baking Tools
- Step by Step Process
- Common Errors and Fixes
- Troubleshooting Common Issues
- Customizing Your Batch
- Truths About Velvet Cakes
- Storage and Freshness
- Serving and Presentation
- Recipe FAQs
- 📝 Recipe Card
Perfect Fudgy Red Velvet Brownies
That first sizzle of butter in the pan always gets me, but it's the smell of the cocoa mixing with vanilla that really hits home. I remember the first time I tried making this dish, I treated it like a cake. I beat the batter into oblivion, thinking more air meant more fluff.
I ended up with something that tasted okay but had the texture of a spongy brick. It was a total letdown.
The turning point was realizing that the "velvet" in the name doesn't mean airy, it means smooth. I started focusing on the sour cream, which is the real hero here. It provides a subtle acidity that reacts with the baking soda to create a tender crumb without the lightness of a sponge cake.
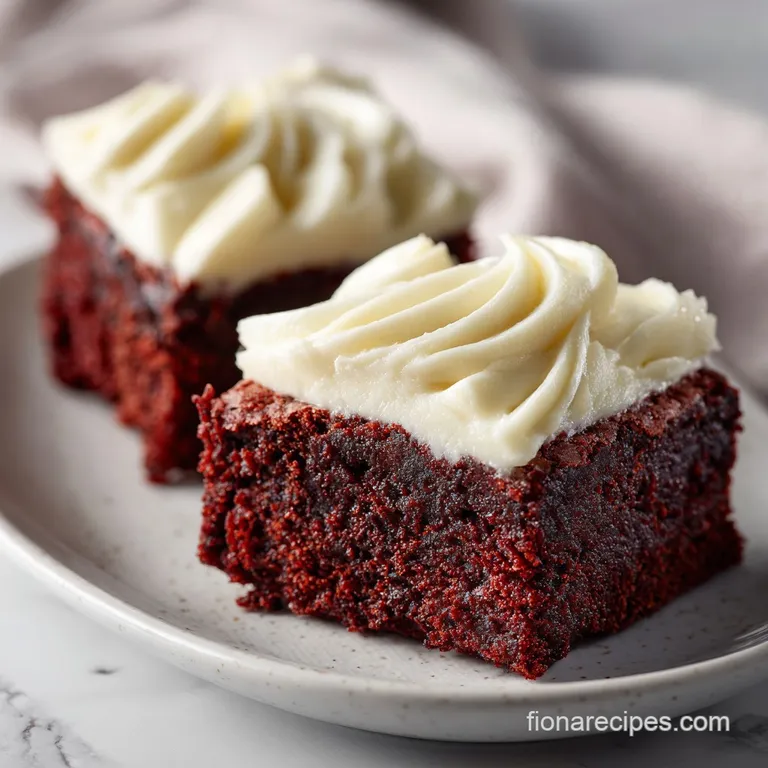
These Red Velvet Brownies are all about that dense, fudgy pull.
You can expect a treat that looks striking and tastes balanced. The sweetness of the powdered sugar is cut by the tang of the cream cheese, and the cocoa provides a deep, earthy base. Trust me on this, once you stop overworking the batter, you'll never go back to the box mix. Let's crack on.
Essential Baking Techniques
When you're aiming for that specific fudgy consistency, you have to treat the batter with respect. Most people fail because they treat brownie batter like cake batter, but the physics are different.
Acid Base Balance: The sour cream provides lactic acid which reacts with the baking soda. This creates just enough lift to keep the brownies from being a solid block of chocolate, but not enough to make them airy.
Fat Emulsification: Beating the eggs and yolks into the melted butter creates a stable emulsion. This ensures the fat is evenly distributed, which is what gives you that velvety mouthfeel.
Controlled Gluten: Overmixing flour develops gluten. In a cake, you might want some structure, but in Red Velvet Brownies, too much gluten makes them chewy like bread. Folding by hand is the only way to go.
Thermal Carryover: Brownies keep cooking after they leave the oven. If you wait until the center looks "done," you've already overbaked them. Removing them while they still have a slight wobble ensures they stay fudgy.
| Method | Time | Texture | Best For |
|---|---|---|---|
| Fast (Mix) | 25 mins | Cakey/Light | Quick cravings |
| Classic (Scratch) | 40 mins | Fudgy/Dense | Special occasions |
Detailed Recipe Specs
Before we hit the kitchen, let's talk about the gear. You don't need a professional setup, but a few specific tools make the process foolproof.
Prepping the Station
Use an 8x8 inch baking pan. If you use a larger pan, the batter spreads too thin and you'll end up with dry crackers instead of brownies. I always use a parchment paper sling, which means the paper hangs over two sides of the pan.
This lets you lift the entire block out once cooled, making it way easier to get clean cuts.
Emulsifying the Batter
A whisk is fine for the butter and sugar, but I recommend a silicone spatula for the final stages. You want to fold the dry ingredients in with a sweeping motion. This keeps the air bubbles you created during the egg beating phase intact without overworking the flour.
Baking to Perfection
Your oven temperature needs to be spot on at 350°F (175°C). If your oven runs hot, you'll get a crust that's too hard. I suggest using an oven thermometer to verify. The key is to pull the pan out when the edges are set but the middle still has a tiny bit of give.
Ingredient Depth Analysis
The magic of this recipe lies in the sour cream. While some people use vinegar or buttermilk, sour cream is denser and adds a level of richness that prevents the brownies from feeling dry. It acts as a tenderizer, breaking down the gluten proteins in the all purpose flour.
Cocoa powder is the other critical element. We use a small amount because this isn't a traditional chocolate brownie, it's a red velvet treat. The cocoa provides the "bass note" of flavor that supports the vanilla and the red coloring. According to Serious Eats, the ratio of fat to flour is what determines if a brownie is "fudgy" or "cakey," and we've leaned heavily into the fat for that decadent feel.
The cream cheese frosting isn't just a topping, it's a structural component. The acidity in the cheese balances the sugar in the base. Using softened butter and cream cheese is non negotiable. If they're too cold, you'll get lumps; if they're melted, the frosting will slide right off your Red Velvet Brownies.
| Ingredient | Science Role | Pro Secret |
|---|---|---|
| Sour Cream | Tenderness/Acid | Room temp for better mixing |
| Cocoa Powder | Flavor Base | Sift it to avoid clumps |
| Egg Yolk | Emulsifier/Richness | Adds a velvety "snap" |
| Baking Soda | Leavening | Reacts with sour cream for lift |
Required Baking Tools
I've found that using a digital scale is the best way to avoid mistakes, but volume measurements work if you're careful. When measuring flour, spoon it into the cup and level it off. Never pack it down, or you'll add too much and end up with a dry result.
For the Brownie Base
You'll need a mixing bowl, a whisk, and a spatula. If you have a stand mixer, you can use it for the initial butter and sugar phase, but switch to hand folding for the flour. This prevents the "bread like" texture that happens when machines overwork the dough.
For the Cream Cheese Frosting
An electric hand mixer is your best friend here. You need to beat the cream cheese and butter until they are completely smooth. If you see any tiny white lumps, keep going. The frosting should look like silk before you add the powdered sugar.
Step by step Process
Right then, let's get into the actual making. Follow these steps exactly, and you'll avoid the common pitfalls I fell into years ago.
- Line an 8x8 inch baking pan with parchment paper, leaving an overhang on the sides, and preheat the oven to 350°F (175°C). Note: The overhang is critical for easy removal.
- Whisk the melted butter and granulated sugar together until combined. until the mixture looks like wet sand.
- Beat in the egg and egg yolk until the mixture is glossy and smooth. Note: This creates the emulsion for a velvety texture.
- Stir in the red food coloring and vanilla extract until the color is uniform and vibrant.
- Sift in the cocoa powder, all purpose flour, baking soda, and salt. Gently fold the mixture with a spatula, avoiding overmixing. until no streaks of flour remain.
- Fold in the sour cream until just incorporated. Note: Do not overbeat here or you'll lose the fudgy density.
- Spread the batter evenly into the prepared pan and bake for 22-25 minutes, until the edges are set and slightly pulling away from the sides.
- Prepare the frosting by beating together softened cream cheese, softened butter, powdered sugar, vanilla extract, and heavy cream until silky.
- Once Red Velvet Brownies have cooled completely, spread the cream cheese frosting evenly over the top.
| Original Ingredient | Substitute | Why It Works |
|---|---|---|
| Sour Cream (2 tbsp) | Greek Yogurt (plain) | Similar acidity and thickness. Note: May be slightly tangier |
| All Purpose Flour (1 cup) | Almond Flour (1 cup) | High fat content. Note: Results in a denser, grainier crumb |
| Heavy Cream (2 tbsp) | Whole Milk (2 tbsp) | Provides liquid for frosting. Note: Slightly less stable/stiff |
| Granulated Sugar (1 cup) | Coconut Sugar (1 cup) | Natural sweetener. Note: Will darken the red color significantly |
Common Errors and Fixes
Most mistakes with Red Velvet Brownies happen during the mixing or the baking window. If yours didn't turn out as expected, it's usually a chemistry issue.
Troubleshooting Common Issues
| Issue | Solution |
|---|---|
| Why Your Brownies Are Cakey | This usually happens because of overmixing. When you stir the flour too vigorously, you develop gluten, which traps air and creates a bread like structure. To avoid this, only fold until the flour dis |
| Why Your Color Is Dull | If your brownies look brown instead of vibrant red, you might be using too much cocoa powder or a low quality food coloring. Ensure you're using a concentrated gel color rather than a liquid one. Also |
| Why Your Frosting Is Runny | This is almost always caused by the cream cheese being too warm or adding too much heavy cream. The butter and cream cheese should be "cool room temperature," meaning they are soft to the touch but no |
Mistake Proof Checklist:
- ✓ Use a parchment sling for a clean lift
- ✓ Stop mixing the moment flour disappears
- ✓ Use a digital thermometer for oven accuracy
- ✓ Cool the base completely before frosting
- ✓ Use room temp cream cheese, not melted
Customizing Your Batch
Once you've nailed the base, you can start playing with variations. The beauty of this recipe is how well it pairs with other creamy or crunchy elements.
Adding White Chocolate
If you want a bit more sweetness, fold in 1/2 cup of white chocolate chips during step 6. The white chips create a beautiful visual contrast against the red batter and add a creamy punch that complements the sour cream.
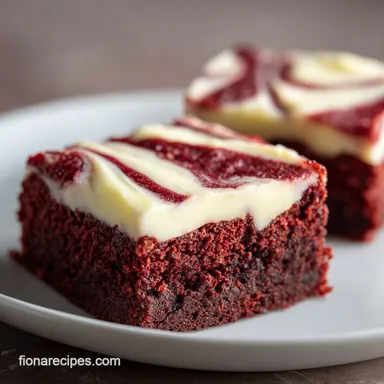
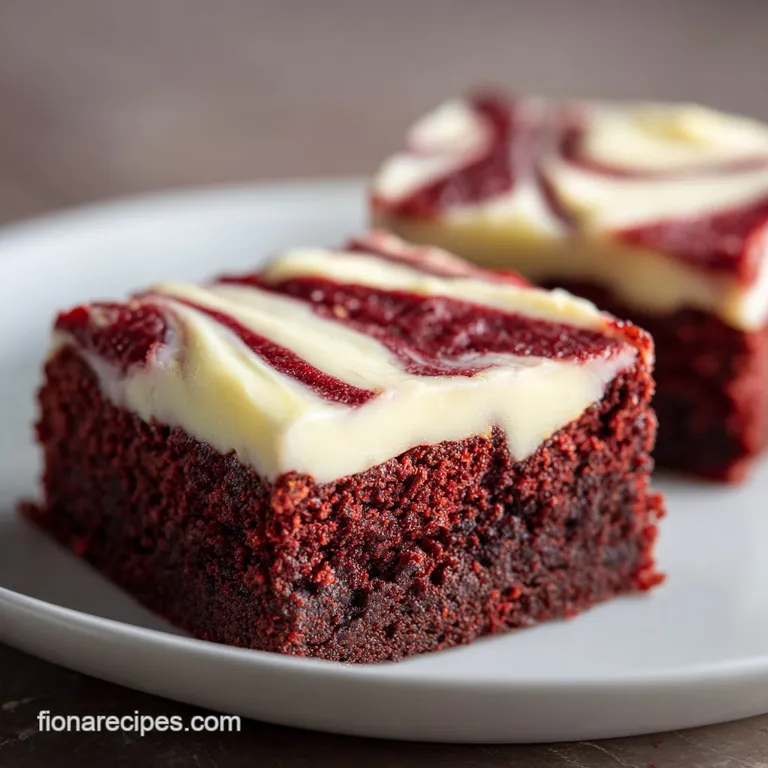
Creating Red Velvet Cheesecake Brownies
Instead of frosting, you can swirl the frosting mixture into the batter. Spoon dollops of the cream cheese mixture onto the raw batter and use a knife to create a marble effect. Bake as usual, and you'll have Red Velvet Cheesecake Brownies that look like they came from a high end bakery.
Making it gluten-free
You can swap the all purpose flour for a 1:1 gluten-free baking blend. However, be aware that GF blends can sometimes be grittier. I recommend letting the batter sit for 15 minutes before baking to allow the rice flour to hydrate, which prevents that "sandy" feel. If you love other sweets, these pair wonderfully with a Vanilla Cupcake Recipe for a full dessert spread.
Decision Shortcut:
- If you want a more intense "chew," add 1 extra egg yolk.
- If you want a cleaner slice, freeze the frosted brownies for 30 mins before cutting.
- If you want more tang, increase sour cream to 3 tbsp.
Truths About Velvet Cakes
There are a few things people get wrong about this style of baking. Let's set the record straight so you can bake with confidence.
One big myth is that red velvet is just chocolate cake with food coloring. That's not true. Traditional red velvet relies on the reaction between cocoa, vinegar (or sour cream), and buttermilk. This creates a specific flavor profile that is more tangy and less "chocolatey" than a standard fudge brownie.
Another misconception is that you need a huge amount of food coloring to get that deep red. If you use the right gel colors and don't overbake them, you can get a vibrant hue without the batter tasting like chemicals. The key is the quality of the pigment, not the quantity.
Storage and Freshness
Because of the cream cheese frosting, these Red Velvet Brownies cannot sit on the counter for days. The dairy in the frosting will spoil if left in a warm kitchen.
Fridge Storage: Store them in an airtight container in the refrigerator for up to 5 days. I actually prefer them cold, as the texture becomes even more fudgy and the frosting sets firmly.
Freezer Storage: You can freeze these for up to 3 months. Wrap each square individually in plastic wrap and then place them in a freezer bag. When you're ready to eat, let them thaw in the fridge overnight.
Zero Waste Tip: If you have leftover frosting, don't toss it. It makes an amazing dip for sliced apples or a topping for a morning piece of toast. If you have leftover brownie scraps, crumble them over vanilla ice cream for a quick parfait.
Serving and Presentation
To get those professional, sharp edged squares, you need a hot knife. Run a thin knife under hot water, wipe it dry, and make one clean slice. Repeat the hot water dip for every single cut.
These are incredibly rich, so a small square is usually enough. I love serving them with a dollop of fresh raspberries or a sprig of mint to cut through the richness. If you're planning a bigger brunch, these provide a great sweet contrast to something savory, like Homemade Biscuits.
For a party, arrange them on a white platter to make the red pop. If you're giving them as a gift, line a box with wax paper and stack them slightly offset. They look stunning and taste even better. Just remember, the best Red Velvet Brownies are the ones shared with friends who appreciate a good, fudgy bite.
Recipe FAQs
How to turn brownie mix into red velvet?
Add red food coloring and cocoa powder. Fold in a spoonful of sour cream before baking to achieve the signature tang and fudgy texture.
Is red velvet really just chocolate cake dyed red?
No, this is a common misconception. While it uses cocoa and red coloring, the combination of sour cream and cream cheese frosting creates a distinct flavor and crumb.
What is the secret ingredient in these red velvet brownies?
The secret is sour cream. It adds a subtle tang that balances the sugar; if you loved the sweet tart balance here, see how we use a similar acid technique in our Italian Lemon Cookies.
Why are my brownies cakey instead of fudgy?
Stop mixing as soon as the flour disappears. Stirring too vigorously develops gluten, which traps air and creates a bread like structure.
How to store red velvet brownies?
Store them in an airtight container in the refrigerator. The dairy in the cream cheese frosting will spoil if left at room temperature.
Can I freeze these brownies?
Yes, wrap them individually in plastic wrap. Place the wrapped squares in a freezer bag for up to 3 months and thaw overnight in the fridge.
Why is the red color dull or brown?
Use a concentrated gel food coloring. Liquid colors are less potent, and adding too much cocoa powder can neutralize the red hue.
Red Velvet Brownies