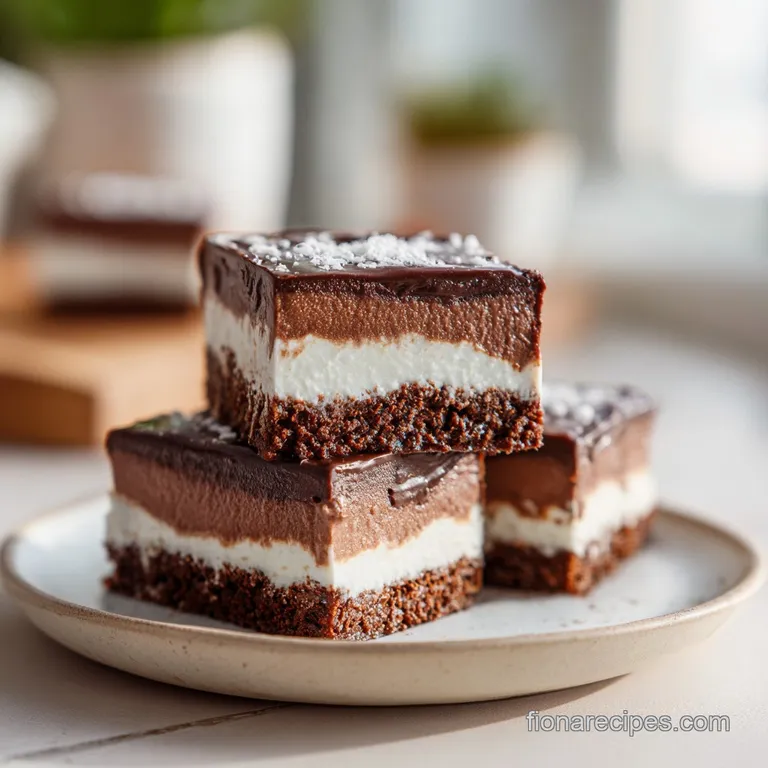
No-Bake Triple Chocolate Velvet Bars
- Time: Active 20 minutes, Passive 240 minutes, Total 260 minutes
- Flavor/Texture Hook: Velvety ganache paired with a shattering dark chocolate snap
- Perfect for: High end dinner parties or foolproof meal prep entertaining
- Precise Ratios for Guaranteed Velvety Results
- Selecting Components for Maximum Flavor Impact
- Essential Tools for Professional Results
- Step-by-Step Guide to Professional Results
- Troubleshooting Your Dessert for a Flawless Finish
- Modifying the Recipe for Different Nutritional Requirements
- Storage Strategies to Maintain Freshness
- Professional Presentation and Serving Techniques
- Recipe FAQs
- 📝 Recipe Card
Precise Ratios for Guaranteed Velvety Results
Understanding the "why" behind this No Bake Dessert with Chocolate is the difference between a runny mess and a professional slice. When we heat the heavy cream to a simmer, we are preparing it to break down the crystalline structure of the chocolate.
Unlike a Bake Dessert with Chocolate for Any Occasion where flour provides the skeleton, here, the fat is the architect.
- Fat Stabilization: The addition of room temperature butter to the ganache after the initial melt introduces a secondary fat source that ensures the filling remains fudgy even when cold.
- Caffeine Synergy: The espresso powder doesn't make the dessert taste like coffee; instead, it acts as a flavor catalyst, heightening the bitter and fruity notes of the chocolate.
- Compression Mechanics: Using a flat bottomed glass to press the cookie base creates a dense, non porous layer that prevents the liquid ganache from soaking in, keeping the base crisp.
- Emulsion Control: Stirring from the center outward when mixing the cream and chocolate prevents excess air from being incorporated, which is what gives the center its glossy, mahogany finish.
| Method | Time | Texture | Best For |
|---|---|---|---|
| Stovetop (Double Boiler) | 10 mins | Ultra smooth, zero risk of burning | Beginners and high end results |
| Microwave (Intervals) | 3 mins | Slightly less glossy, very fast | Quick prep and experienced cooks |
| Oven (Low Temp) | N/A | Not recommended for this recipe | N/A |
The choice between stovetop and microwave melting is about heat distribution. I personally prefer the stovetop method for this Dessert with Chocolate for Any Occasion because the steam provides a gentle, ambient heat that prevents the cocoa butter from separating.
If the chocolate gets too hot, it loses its ability to set firmly, leading to a "bloom" or white streaks on the surface.
Selecting Components for Maximum Flavor Impact
Success with a No Bake Dessert with Chocolate for Any Occasion depends entirely on the quality of your raw materials. Since there is no baking process to mask inferior ingredients, every note of the chocolate and vanilla will be front and center.
I always recommend using a semi sweet chocolate with at least 60% cocoa solids. Anything lower tends to be too high in sugar, which can prevent the ganache from setting with that characteristic "fudge" bite we are looking for.
| Component | Science Role | Pro Secret |
|---|---|---|
| Heavy Cream (36%+) | Provides the liquid phase for the emulsion | Never let it reach a rolling boil or it will break the chocolate |
| Semi Sweet Chocolate | Structural foundation via cocoa butter | Finely chop the bars to ensure an even melt without hot spots |
| Espresso Powder | Molecular flavor enhancer | Sift it into the cream to prevent bitter clumps in the ganache |
The butter used in the base should be unsalted so you have total control over the sodium levels. I’ve found that using a high fat European style butter can add a noticeable richness to the cookie layer, making it feel more like a shortbread than a simple crumb crust.
For the top layer, the neutral oil is non negotiable; it lowers the melting point of the dark chocolate chips just enough so that they don't shatter into a million pieces when you try to slice the bars.
Ingredients List:
- 300g chocolate sandwich cookies (finely crushed) - Why this? Provides a dark, cocoa rich base with built in creaminess. (Sub: Graham crackers with 2 tbsp cocoa)
- 85g unsalted butter (melted) - Why this? Acts as the "glue" that hardens the base in the freezer. (Sub: Salted butter, omit extra salt)
- 1/4 tsp fine sea salt - Why this? Cuts through the sugar to highlight the chocolate’s acidity. (Sub: Table salt, use slightly less)
- 340g semi sweet chocolate (60% cocoa, finely chopped) - Why this? The high fat to sugar ratio ensures a firm, velvety set. (Sub: Dark chocolate chips, though less smooth)
- 240ml heavy cream (min 36% fat) - Why this? Essential for creating a stable, pourable ganache emulsion. (Sub: Full fat coconut milk for a dairy-free twist)
- 30g unsalted butter (room temperature) - Why this? Adds a professional grade sheen and "melt away" mouthfeel. (Sub: Coconut oil, solid state)
- 1 tsp pure vanilla extract - Why this? Rounds out the earthy notes of the cacao. (Sub: Vanilla bean paste)
- 1/2 tsp instant espresso powder - Why this? Deepens the chocolate profile without adding coffee flavor. (Sub: Instant coffee granules, crushed fine)
- 100g dark chocolate chips - Why this? Creates a thin, crisp barrier for the top layer. (Sub: Milk chocolate chips for a sweeter finish)
- 1 tbsp neutral oil - Why this? Prevents the top chocolate layer from cracking during slicing. (Sub: Melted coconut oil)
- 1/2 tsp flaky sea salt - Why this? Provides a textural crunch and essential flavor contrast. (Sub: Coarse kosher salt)
Much like when I'm making my Soft Chocolate Chip Cookies, the temperature of the fats here is paramount. Cold butter won't emulsify into the ganache properly, and too hot cream will scorch the delicate chocolate solids. It's about finding that middle ground where chemistry does the heavy lifting for you.
Essential Tools for Professional Results
You don't need a lot of gear for this Dessert with Chocolate for Any Occasion, but what you use must be handled correctly. A heavy bottomed saucepan is vital for the cream; thin pans have hot spots that can scorch the dairy, leading to a burnt aftertaste that ruins the entire batch.
I also highly recommend a digital kitchen scale. Measuring 340g of chocolate by weight is significantly more accurate than using cups, especially when the chop size can vary so much.
For the pan, an 8x8 inch square baking pan is the standard. If you use a 9x9 pan, your layers will be thinner and may not have the same visual impact. The most critical tool, however, is the parchment paper.
You must leave an overhang often called "parchment wings" so you can lift the entire chilled block out of the pan. Trying to slice this No Bake Dessert inside a metal pan is a recipe for scratched cookware and mangled squares.
| Tool | Purpose | Advantage |
|---|---|---|
| 8x8 Square Pan | Defines the height of the three layers | Uniform thickness for even chilling |
| Heat Proof Glass Bowl | Safe melting environment for chocolate | Retains gentle heat to keep ganache fluid |
| Flat Bottomed Glass | Compressing the cookie base | Creates a level, dense foundation |
Chef's Tip: Before you start, wipe your mixing bowl with a bit of lemon juice or white vinegar. This removes any trace of grease that might interfere with the glossy finish of your ganache.
step-by-step Guide to Professional Results

Precision is the hallmark of a great home cook. To ensure this Chocolate for Any Occasion turns out exactly as intended, follow these steps with an eye on the clock and the texture of your ingredients.
We are building this from the bottom up, allowing each layer to reach its specific structural "checkpoint" before moving to the next.
- Line an 8x8 inch square baking pan with parchment paper, ensuring you leave at least two inches of overhang on the sides. Note: This is essential for lifting the bars out later.
- Combine the 300g of crushed cookies, 85g of melted butter, and 1/4 tsp of sea salt in a bowl. Mix until the crumbs are thoroughly coated and look like wet sand.
- Transfer the crumbs to the pan and press them into a firm, even layer using the bottom of a flat glass. Freeze the base for 10 minutes until it feels solid to the touch.
- Place the 340g of chopped semi sweet chocolate in a heat proof glass bowl. In your small saucepan, heat the 240ml of heavy cream and 1/2 tsp of espresso powder over medium low heat.
- Remove the cream just as small bubbles begin to form around the edges (do not let it boil). Pour the hot cream over the chocolate and let it sit undisturbed for exactly 3 minutes.
- Stir the mixture gently with a spatula, starting in the center and working outward, until a smooth, glossy mahogany liquid forms.
- Add the 30g of room temperature butter and 1 tsp of vanilla extract. Stir until the butter has completely melted and disappeared into the ganache.
- Pour the ganache over your frozen crust and smooth it with a spatula. Place the pan in the refrigerator and chill for 2 hours until the center is set but still slightly tacky.
- Melt the 100g of dark chocolate chips and 1 tbsp of neutral oil in the microwave in 20 second bursts. Stir until smooth and pour over the ganache layer.
- Sprinkle the 1/2 tsp of flaky sea salt across the top. Chill for another 2 hours until the entire block is firm and cold.
- Weight
- Exactly 340g of chocolate ensures the ganache sets firmly enough to slice but remains soft enough to melt on the tongue.
- Temperature
- The cream should reach approximately 180°F (82°C) before being poured; any hotter and the chocolate fat may separate.
- Time
- A full 4 hours of total chilling time (2 hours for the ganache, 2 hours for the topping) is required to allow the cocoa butter crystals to stabilize.
Troubleshooting Your Dessert for a Flawless Finish
Even with the most precise instructions, chocolate can be temperamental. The environment of your kitchen humidity and ambient temperature can play a role in how the fats behave. If you find yourself with a ganache that won't set or a top layer that shatters like glass, don't panic.
Most issues in a Bake Dessert with Chocolate for Any Occasion can be traced back to temperature fluctuations.
Why Your Ganache Is Too Soft
If your center layer feels more like a thick sauce than a fudge bar after two hours, the cream to chocolate ratio was likely skewed, or the cream was too hot when poured. High heat can damage the chocolate's ability to re solidify. If this happens, you can often save it by placing the pan in the freezer for an hour.
It will be harder to slice, but the texture will firm up enough to be served.
The Ganache Looks Grainy or Split
A "split" ganache occurs when the fat separates from the cocoa solids, usually because the mixture was stirred too vigorously or too quickly. To fix a split ganache before it sets, add a tablespoon of room temperature heavy cream and stir very gently.
The extra liquid helps re emulsify the fats, bringing back that velvety, glossy appearance that makes this Chocolate for Any Occasion so visually striking.
| Problem | Root Cause | Solution |
|---|---|---|
| Grainy Texture | Chocolate was scorched or cream was too hot | Melt chocolate over a water bath next time; stir in a tsp of warm cream now |
| Top Layer Cracking | Missing oil in the topping or cutting while too cold | Add 1 tbsp neutral oil to the melt; use a warm, wet knife to slice |
| Sinking Base | Crumbs weren't pressed firmly enough | Use a heavy glass to compress the base until it feels like a solid block |
Common Mistakes Checklist:
- ✓ Ensure the heavy cream is at a gentle simmer, not a rolling boil, to protect the chocolate.
- ✓ Let the chocolate and cream sit for the full 3 minutes before stirring to allow for even heat distribution.
- ✓ Use a warm knife (dipped in hot water and wiped dry) to slice for the cleanest edges.
- ✓ Don't skip the espresso powder; it’s the secret to making the chocolate "pop."
- ✓ Always use parchment paper with "wings" to avoid mangling the bars during removal.
Modifying the Recipe for Different Nutritional Requirements
The beauty of this No Bake Dessert with Chocolate is its adaptability. While the original recipe is a masterclass in rich, dairy forward flavors, you can scale it or adjust the ingredients for various needs without losing the core experience.
When scaling down, remember that a smaller surface area (like a loaf pan) will require a bit more chilling time because the layers will be thicker.
If you are looking to scale up for a large party, a 9x13 inch pan is your best friend. For a double batch, you only need to increase the salt and espresso by 1.5x to avoid overwhelming the other flavors. The liquids should be reduced by about 10% when doubling to ensure the structural integrity holds up over the larger surface area. If you're interested in other no bake options, my No Bake Peanut Butter Bars offer a similar textural experience with a different flavor profile.
| Original Ingredient | Substitute | Why It Works |
|---|---|---|
| Heavy Cream | Full fat Coconut Milk | Similar fat content. Note: Adds a subtle tropical flavor to the Chocolate for Any Occasion. |
| Butter (Base) | Coconut Oil (Refined) | Provides a solid set at room temperature. Note: Refined oil has no coconut taste. |
| Chocolate Cookies | gluten-free Sandwich Cookies | Maintains the crunch and dark color without the wheat. Note: May require 10g more butter. |
For those looking for a "Decision Shortcut": If you want a richer, darker bar, use 72% dark chocolate for the ganache and omit the vanilla. If you want a sweeter, kid friendly version, swap the semi sweet chocolate for high-quality milk chocolate and reduce the espresso powder to a pinch.
If you want a mocha forward flavor, increase the espresso powder to 1.5 tsp and use a coffee flavored chocolate sandwich cookie for the base.
Storage Strategies to Maintain Freshness
Because this No Bake Dessert with Chocolate for Any Occasion relies on dairy and stabilized fats, proper storage is the difference between a gourmet treat and a stale one. Chocolate is highly porous and will absorb odors from your refrigerator (like onions or garlic) if not sealed properly.
I recommend an airtight container or double wrapping the pan in plastic wrap and aluminum foil.
- Fridge Storage: These bars will stay fresh and fudgy for up to 5 days. After that, the cookie base may begin to soften as it absorbs moisture from the ganache.
- Freezer Storage: This dessert freezes exceptionally well for up to 3 months. Wrap individual slices in parchment paper and then foil. To serve, thaw in the fridge for 2 hours; do not thaw at room temperature or the chocolate may develop condensation (sweat).
- Zero Waste Tip: If you have leftover cookie crumbs, save them in a jar! They make an incredible topping for vanilla bean ice cream or can be folded into a batch of Easy No Knead Bread for a chocolate swirl artisan loaf. Any leftover ganache can be rolled into truffles and coated in cocoa powder.
Professional Presentation and Serving Techniques
Serving this Chocolate for Any Occasion is all about the "clean slice." To achieve those sharp, professional edges you see in bakeries, you need to use the warm knife technique. Submerge a long, sharp chef's knife in a tall container of hot water for 30 seconds.
Wipe it completely dry, make one long, decisive cut, then clean and re warm the knife before the next slice. This prevents the different layers from smearing into each other.
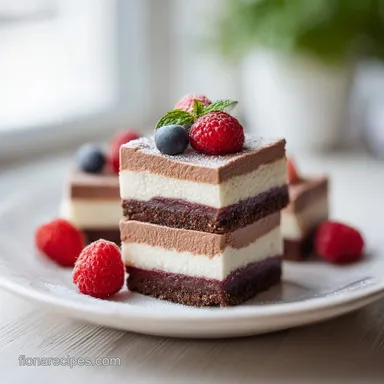
To really lean into the "Any Occasion" aspect, think about your garnishes. For a summer garden party, a single fresh raspberry and a mint leaf on each square provide a bright acidity that cuts through the richness.
For a winter holiday, a light dusting of gold luster dust or a few pomegranate seeds adds a festive, jewel like quality. The flaky sea salt we added at the end is the primary seasoning, but don't be afraid to experiment with a drizzle of salted caramel or a dollop of unsweetened whipped cream on the side.
Ultimately, the success of this No Bake Dessert with Chocolate comes down to the respect you show the ingredients. By following the precise weights and timing windows, you’ve created something that defies the "easy" label of no bake treats.
It is a sophisticated, multi layered experience that proves you don't need an oven to achieve dessert perfection. Enjoy the process of the melt, the patience of the chill, and the inevitable satisfaction of that first, perfect, shattering bite.

Recipe FAQs
How to ensure the crust sets perfectly?
Press the cookie and butter mixture firmly into the pan using the flat bottom of a glass. This compression is critical before you freeze it for 10 minutes to lock the structure in place.
Is it true I should stir the ganache vigorously while pouring the cream?
No, this is a common misconception. You must let the hot cream sit on the chocolate undisturbed for 3 minutes, then stir gently from the center outward to create a smooth, stable emulsion.
How to avoid graininess when melting the dark chocolate topping?
Heat the chocolate chips and oil in 20-second intervals in the microwave. Stir thoroughly between each cycle to ensure even heat distribution without scorching the cocoa solids.
How to get clean slices without cracking the top layer?
Run your knife under hot water and wipe it dry before each cut. A warm blade glides through the chocolate layers, preventing the hardened top from shattering during portioning.
Why is my ganache not setting after two hours in the fridge?
Check the fat content of your heavy cream. Using cream with less than 36% fat will result in a ganache that remains too soft; if you enjoyed this precision, see how the same principles of fat ratios apply to our Mini Rolo Cheesecakes.
How to store these bars so they don't taste like other food in the fridge?
Seal the bars in an airtight container or double wrap the pan tightly with plastic wrap. Chocolate is highly porous and will quickly absorb strong smells from other items in your refrigerator.
How long can I keep these in the refrigerator?
Consume within 5 days for the best quality. Beyond this point, the cookie base will lose its snap as it begins to soften from the moisture in the ganache layer.
Triple Chocolate Velvet Bars
Ingredients:
Instructions:
Nutrition Facts:
| Calories | 351 kcal |
|---|---|
| Protein | 2.6 g |
| Fat | 25.2 g |
| Carbs | 28.4 g |
| Fiber | 2.1 g |
| Sugar | 18.3 g |
| Sodium | 122 mg |
