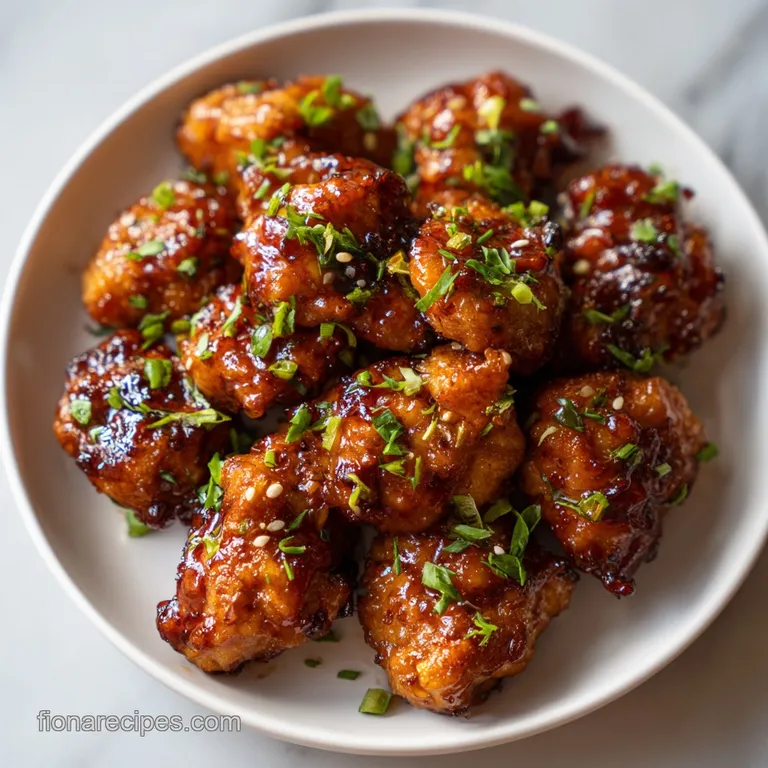
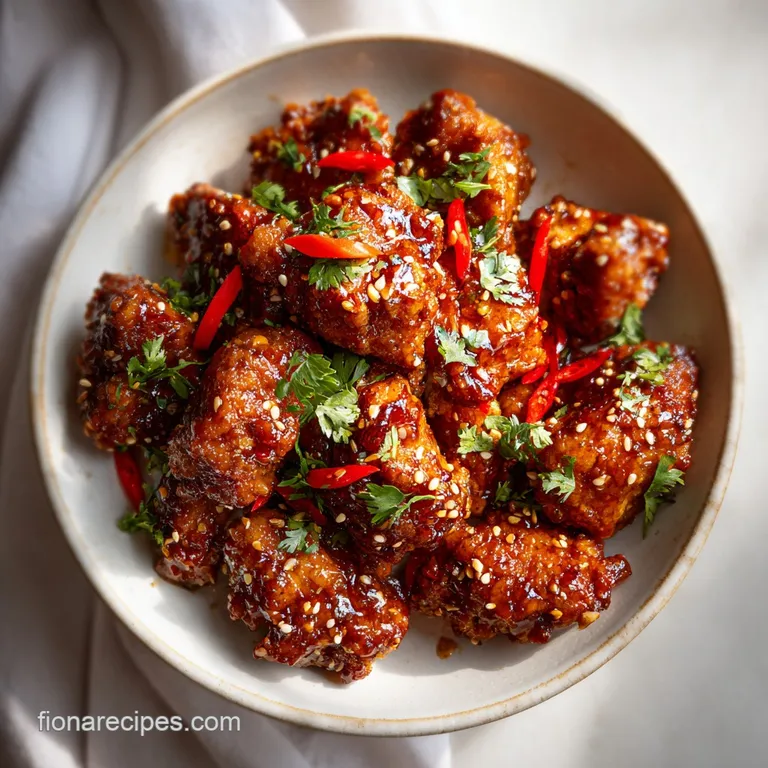
Sticky Thai Chicken Bites Recipe
- Time: Active 10 minutes, Passive 10 minutes, Total 20 minutes
- Flavor/Texture Hook: Shatteringly crispy exterior with a velvety, honey glazed finish
- Perfect for: Stress free weeknight dinners or a crowd-pleasing party appetizer
- Master the Ultimate Thai Chicken Bites
- Essential Techniques for a Crispy Golden Finish
- Timing and Nutrition Specs for Easy Planning
- The Core Building Blocks of Thai Flavor
- Necessary Equipment for a Stress Free Cook
- A Seamless Flow from Prep to Plate
- Common Mistakes and Simple Troubleshooting Fixes
- Creative Flavor Twists and Easy Ingredient Swaps
- Preservation Secrets for Fresh Tasting Leftovers
- Serving Suggestions for a Complete Family Dinner
- Common Questions about Thai Chicken Bites
- Troubleshooting Common Issues
- High in Sodium
- Recipe FAQs
- 📝 Recipe Card
Master the Ultimate Thai Chicken Bites
The first time I tried to make a version of these, the kitchen smelled like a dream, but the chicken was a soggy mess. I remember the sizzle of the oil hitting the pan and thinking I had it all figured out, only to watch my crispy coating slide right off into a pool of soy sauce.
It was a Tuesday night, the kids were hungry, and I felt like I'd failed the "easy dinner" test. But that flop taught me the most important lesson about working with starch and high heat, and I’ve never looked back since.
Now, when I drop these 1 inch cubes into the skillet, the sound is like a sharp, rhythmic crackle that tells me the crust is setting perfectly. The aroma of fresh ginger and garlic hitting the warm oil is enough to bring everyone into the kitchen before I even call them for dinner.
We have made this so many times that I can practically do it with my eyes closed, and it’s become the "comfort food" my family asks for when we’ve had a long, tiring day. It’s real food, done fast, without any of the fuss of deep frying.
You are going to love how the lime juice cuts through the sweetness of the honey at the very end. It’s that hit of acid that makes everything wake up and taste fresh, rather than just heavy and sugary.
We're keeping things simple today, focusing on a few key techniques that ensure your chicken stays tender on the inside while getting that gorgeous mahogany glaze on the outside. Trust me, once you see how easy this is, you'll be tossing those takeout menus in the bin for good.
Essential Techniques for a Crispy Golden Finish
The Physics of the Starch Snap: Cornstarch creates a thin, microscopic lattice that blocks moisture from escaping while the high heat rapidly dehydrates the surface. This dual action creates a protective shell that stays crispy even after being tossed in a liquid glaze.
- over High heat Searing: You want that pan hot enough that the oil shimmers and almost smokes, which allows the starch to gelatinize and crisp up instantly.
- Single Layer Logic: Crowding the pan drops the temperature and causes the chicken to steam in its own juices, resulting in a rubbery texture rather than a crisp one.
- Emulsified Glaze: By whisking the honey and soy sauce thoroughly before adding them to the pan, you ensure the sugars caramelize evenly around every piece.
- The Residual Carryover: Pulling the chicken just as it hits its internal temperature ensures the meat remains juicy as it rests for a few minutes before serving.
| Method | Time | Texture | Best For |
|---|---|---|---|
| Stovetop Skillet | 10 minutes | Maximum crispiness with caramelized edges | Quickest weeknight result |
| Air Fryer | 12 minutes | Evenly browned and lower in fat | Hands off cooking |
| Oven Baked | 18 minutes | Consistent cook but less "snap" to the crust | Large batches for parties |
Whether you are using a heavy cast iron skillet or a non stick pan, the goal remains the same: high heat and plenty of space. If you are cooking for a larger family, I highly recommend working in two batches to maintain that vital sizzle. If you enjoy this type of quick, protein packed meal, you might also find our Chicken Piccata Recipe to be a great addition to your rotation.
Timing and Nutrition Specs for Easy Planning
Getting the timing right is the secret to a stress free evening. I like to have everything measured out before the heat even goes on. Since the actual cooking happens in a flash, you don't want to be peeling garlic while the chicken is already browning.
It’s all about that prep flow that keeps things calm in the kitchen.
| Component | Science Role | Pro Secret |
|---|---|---|
| Cornstarch | Moisture Barrier | Pat the chicken dry with paper towels before coating for the best adhesion. |
| Raw Honey | Caramelization Agent | The natural sugars create a sticky "glue" that helps the spices cling to the meat. |
| Fresh Ginger | Protease Enzymes | Ginger contains enzymes that help break down tough proteins, making the breast meat extra tender. |
Using fresh ginger makes a world of difference compared to the dried stuff. If you struggle with grating it, try keeping a knob of ginger in the freezer. It becomes much easier to grate when it's solid, and you won't end up with those long, stringy fibers in your sauce. This recipe is also quite similar in its crowd pleasing nature to our Slow Cooker Crack recipe, though much faster to get on the table.
The Core Building Blocks of Thai Flavor
- 1.5 lbs chicken breast: Cut these into uniform 1 inch cubes so they all finish at the exact same time. Why this? Breast meat stays lean and picks up the glaze flavors beautifully.
- Substitute: Chicken thighs (skinless/boneless) for a richer, juicier bite.
- 2 tbsp cornstarch: This is the secret to that light, airy crunch. Why this? It creates a gluten-free crust that is crispier than wheat flour.
- Substitute: Arrowroot powder for a similar grain free effect.
- 0.33 cup low sodium soy sauce: This provides the savory, salty base. Why this? Low sodium prevents the final dish from becoming an salt bomb after reduction.
- Substitute: Tamari or liquid aminos for a gluten-free option.
- 0.25 cup raw honey: For that signature sticky sweetness. Why this? Honey thickens into a glaze faster than granulated sugar.
- Substitute: Maple syrup, though it will have a slightly thinner consistency.
- 2 tbsp Thai sweet chili sauce: This adds the "Thai" flair and a hint of spice. Why this? It provides both sugar and acidity in one go.
- Substitute: A mix of hot sauce and a pinch of brown sugar.
- 1 tbsp fresh ginger: Grated finely for maximum infusion. Why this? Adds a sharp, warming depth that balances the honey.
- Substitute: 1 tsp ground ginger in a pinch, though the flavor is flatter.
- 1 tbsp fresh lime juice: Added at the very end to brighten the palate. Why this? The acid cuts through the sugar and fat for a clean finish.
- Substitute: Rice vinegar or lemon juice.
Chef's Tip: Don't throw away your cilantro stems! Chop them up very finely and add them into the pan along with the garlic and ginger. They hold even more flavor than the leaves and add a nice little crunch to the sauce.
Necessary Equipment for a Stress Free Cook
You don't need anything fancy for this. A good large skillet is your best friend here. I prefer stainless steel or cast iron because they hold onto heat better than thin non stick pans, which helps get that deep golden color we're looking for. You'll also want a large mixing bowl to toss the chicken in the cornstarch.
If you have a spray bottle for your oil, like avocado oil spray, it's perfect for this. It allows you to coat the pan evenly without drenching the chicken in fat. A pair of silicone tipped tongs is also helpful for flipping the individual bites without scraping off the delicate starch coating. If you're used to making hearty meals like a Chicken Pot Pie Recipe, you'll appreciate how few dishes this one pan meal actually generates.
A Seamless Flow from Prep to Plate
1. The Dry Coat Phase
Place your 1 inch chicken cubes in a large bowl. Sprinkle over the 2 tbsp cornstarch, 1 tsp garlic powder, 0.5 tsp sea salt, and 0.5 tsp white pepper. Toss vigorously until every single piece is matte and white. Note: This coating is what will eventually turn into your crispy crust.
2. The over High heat Blast
Heat your skillet over medium high heat and coat with 1 tbsp avocado oil spray. Once the pan is shimmering, add the chicken in a single layer. Cook for 3 minutes without moving them until a golden crust forms on the bottom.
3. The Flip and Sear
Use tongs to flip the pieces over. Cook for another 3 minutes until the chicken is opaque and firm to the touch. Don't worry if they aren't fully cooked through yet; they will finish in the sauce.
4. The Aromatics Hit
Push the chicken to the edges of the pan, creating a small well in the center. Add the 2 minced cloves of garlic and 1 tbsp grated fresh ginger. Sauté for 30 seconds until the fragrance fills the room but the garlic hasn't turned brown.
5. The Sauce Integration
Pour in the 0.33 cup soy sauce, 0.25 cup raw honey, and 2 tbsp sweet chili sauce. Stir everything together so the chicken is completely submerged in the bubbling liquid. Note: The honey will begin to foam and thicken almost immediately.
6. The Glaze Reduction
Continue to simmer for 2 to 3 minutes. You'll see the sauce transform from a thin liquid into a thick, syrupy glaze that clings to the chicken. Stop when the sauce coats the back of a spoon.
7. The Brightness Boost
Turn off the heat. Squeeze in 1 tbsp fresh lime juice and toss one last time. Note: Adding acid after the heat is off preserves the fresh, zesty flavor profile.
8. The Final Toss
Transfer the Thai Chicken Bites to a serving platter. Sprinkle with 2 tbsp chopped cilantro, 1 tsp toasted sesame seeds, and the sliced red bird's eye chili if you want that extra heat. Serve immediately with extra lime wedges on the side.
Common Mistakes and Simple Troubleshooting Fixes
Why Your Chicken Bites Are Soggy
This usually happens for one of two reasons: either the pan wasn't hot enough when the chicken went in, or you crowded too many pieces into the skillet. When chicken is crowded, it releases moisture that can't evaporate quickly, which essentially boils the meat in its own juices.
To fix this, always cook in batches if your pan isn't large enough to keep space between every piece.
If Your Sauce Is Too Thin
If the glaze isn't sticking to the chicken, you simply haven't reduced it long enough. The honey and soy sauce need a few minutes of bubbling to evaporate the water and concentrate the sugars.
If you're in a real rush, you can whisk a tiny bit more cornstarch with cold water and stir it into the boiling sauce, but usually, a little extra time on the heat does the trick naturally.
| Problem | Root Cause | Solution |
|---|---|---|
| Coating falling off | Chicken was too wet before starching | Pat meat dry with paper towels before tossing in cornstarch. |
| Burnt, bitter sauce | Honey overheated or garlic scorched | Keep the heat at medium high and stir constantly once the sauce is added. |
| Tough, dry chicken | Overcooked during the initial sear | Only sear for 3 mins per side; let the residual heat of the glaze finish the cooking. |
Common Mistakes Checklist ✓ Never skip the step of patting the chicken dry; moisture is the enemy of a good sear. ✓ Ensure the oil is shimmering before adding the first piece of chicken. ✓ Use low sodium soy sauce to maintain control over the salt levels as the sauce reduces.
✓ Don't add the lime juice too early, or the heat will kill its bright, fresh notes. ✓ Work in batches if you're using a skillet smaller than 12 inches.
Creative Flavor Twists and Easy Ingredient Swaps
If you want to change things up, this recipe is incredibly flexible. I sometimes swap the honey for brown sugar if I'm out, which gives it a more molasses like depth. For those who need a keto friendly version, you can use a keto approved sweetener like monk fruit syrup and replace the cornstarch with unflavored whey protein isolate or almond flour, though the texture will be slightly softer.
| Original Ingredient | Substitute | Why It Works |
|---|---|---|
| Honey (0.25 cup) | Maple Syrup (0.25 cup) | Similar viscosity. Note: Adds a woody, autumnal flavor instead of floral sweetness. |
| Soy Sauce (0.33 cup) | Coconut Aminos (0.33 cup) | Lower sodium and soy free. Note: Slightly sweeter, so reduce the honey by 1 tbsp. |
| Avocado Oil (1 tbsp) | Coconut Oil (1 tbsp) | High smoke point. Note: Adds a subtle tropical aroma that pairs well with Thai flavors. |
If you are looking for a more plant based approach, extra firm tofu works wonderfully here. Just make sure to press the tofu for at least 30 minutes to remove all the water before cubing it and tossing it in the cornstarch.
You'll get that same shattering crust and sticky exterior that makes the chicken version so addictive.
Preservation Secrets for Fresh Tasting Leftovers
Storing these is simple, but getting them back to that "just cooked" texture takes a little trick. Keep any leftovers in an airtight container in the fridge for up to 3 days. Because the sauce is honey based, it will thicken up significantly when cold, making the chicken look a bit dull.
Don't worry the flavor is still all there!
For the best results when reheating, avoid the microwave if you can. The microwave tends to make the starch coating rubbery and the chicken tough. Instead, pop them back into a dry skillet over medium heat for about 5 minutes, tossing frequently.
This will re melt the honey glaze and help the exterior regain some of its original snap. If you must use a microwave, cover the dish with a damp paper towel and heat in 30 second bursts to keep the meat from drying out.
To minimize waste, if you find yourself with just a few pieces left over, chop them up and toss them into a cold salad the next day. The bold ginger and garlic flavors hold up beautifully even when served cold, and they make a great high protein topper for a quick lunch.
You can also use the leftover sauce at the bottom of the container to whisk into a simple vinaigrette with a little extra lime and oil.
Serving Suggestions for a Complete Family Dinner
The best way to serve these Thai Chicken Bites is over a bed of fluffy jasmine rice or coconut rice. The rice acts like a sponge for all that extra sticky glaze, ensuring not a single drop of flavor goes to waste.
If you want to keep things lighter, they are fantastic inside large butter lettuce leaves, served "wrap style" with some shredded carrots and cucumbers for crunch.
- If you want more crunch, add crushed roasted peanuts or cashews on top just before serving.
- If you want a complete meal, stir fry some snap peas or broccoli in the same pan right after you remove the chicken.
- If you want a spicy kick, double the amount of red bird's eye chilies or add a teaspoon of sriracha to the sauce.
I often serve this alongside a simple cucumber salad dressed with rice vinegar and sesame oil. The cool, crisp vegetables provide a perfect contrast to the warm, sticky chicken. It's the kind of meal that feels like a special treat but is actually easier to pull off than most of our standard weeknight rotations.
Just remember to have plenty of lime wedges on the table everyone always wants an extra squeeze!
Common Questions about Thai Chicken Bites
Troubleshooting Common Issues
| Issue | Solution |
|---|---|
| Use frozen chicken for this recipe | Yes, you can use frozen chicken, but it must be completely thawed and patted extremely dry before you start. Any excess moisture from the thawing process will turn the cornstarch into a gummy paste ra |
| Is this recipe spicy | As written, the recipe has a very mild heat from the sweet chili sauce. The red bird's eye chili is used as a garnish, so you can leave it out entirely if you are cooking for children or people sensit |
| Make this in an Air Fryer | Absolutely! To air fry, coat the chicken in the starch and spices as directed, then spray the pieces generously with avocado oil. Air fry at 400°F (200°C) for 10-12 minutes, shaking the basket halfway |
| Stop the honey from burning in the pan | Honey has a high sugar content and can burn quickly if left unattended on high heat. The trick is to add the sauce only after the chicken is mostly cooked and the heat has been slightly regulated. Onc |
| Why is cornstarch better than flour for this | Cornstarch is pure starch, whereas all purpose flour contains protein (gluten). When fried or seared, cornstarch creates a much crispier, more brittle crust that doesn't get as heavy or doughy as flou |

High in Sodium
1125 mg mg of sodium per serving (49% % of daily value)
The American Heart Association recommends limiting sodium intake to about 2,300mg per day for overall cardiovascular health.
Actionable Tips to Reduce Sodium
-
Dilute Soy Sauce-20%
Reduce the sodium content significantly by using half the amount of low-sodium soy sauce (0.17 cup) and replacing the other half with water. This will lower the sodium without drastically affecting the flavor. Consider adding a splash of rice vinegar for extra depth. Estimated Sodium Reduction: 20%
-
Reduce Sea Salt-15%
Cut the amount of sea salt in half (0.25 tsp) or eliminate it completely. The other ingredients provide enough flavor to compensate for the salt reduction. Estimated Sodium Reduction: 15%
-
Control Chili Sauce-10%
Reduce the amount of Thai sweet chili sauce used. Alternatively, use a homemade version where you can control the amount of sodium. Consider using fresh chili peppers for heat and flavor with less sodium. Estimated Sodium Reduction: 10%
-
Boost Lime & Ginger-5%
Increase the amount of fresh lime juice and grated ginger to enhance the flavor profile, naturally reducing the need for sodium. Consider adding lime zest for additional flavor. Estimated Sodium Reduction: 5%
-
Flavor with Herbs & Spices
Experiment with a wider variety of herbs and spices like smoked paprika, black pepper, or onion powder to enhance the flavor of the dish without adding sodium.
Recipe FAQs
Can I use frozen chicken breasts for this recipe?
No, they must be fully thawed and dry. If you attempt to cook partially frozen chicken, the outside will burn before the inside reaches a safe temperature, and the moisture will turn the coating gummy.
How do I prevent the honey glaze from burning during reduction?
Reduce the heat slightly and stir constantly once the sauce enters the pan. Honey caramelizes very fast; lower the heat from high to medium, ensuring the chicken is nearly cooked before the thick glaze forms.
How to ensure the chicken stays crispy after tossing in the sauce?
Toss the chicken in the sauce for only 1 to 2 minutes on medium heat. The goal is just to coat the chicken, not to simmer it for a long time, which rehydrates the starch coating.
Is it true that using almond flour instead of cornstarch results in the exact same crunch?
No, this is a common misconception. Almond flour adds fat and density; it creates a heartier, softer crust, whereas cornstarch yields the light, shatteringly crispy texture essential for this dish.
How should I prepare the chicken for uniform cooking?
Cut all pieces precisely to 1 inch cubes. Uniform sizing is crucial so that every piece hits that perfect internal doneness simultaneously, avoiding any dry or undercooked bites.
Can I substitute the honey with maple syrup and keep the same amount?
Yes, you can substitute maple syrup, but be mindful of consistency. Maple syrup is slightly thinner than honey, so the resulting glaze might be a little less viscous; you may need 30 seconds less reduction time.
What side dish pairs best with the sticky, sweet, and savory flavor profile?
Serve immediately over fluffy jasmine rice to absorb the extra glaze. This flavor balance works similarly to the sweet and savory notes in our Asian Meatballs Crockpot recipe, making it a satisfying main course.
Easy Thai Chicken Bites

Ingredients:
Instructions:
Nutrition Facts:
| Calories | 398 kcal |
|---|---|
| Protein | 54 g |
| Fat | 7.4 g |
| Carbs | 26 g |
| Fiber | 0.6 g |
| Sugar | 22 g |
| Sodium | 1125 mg |
