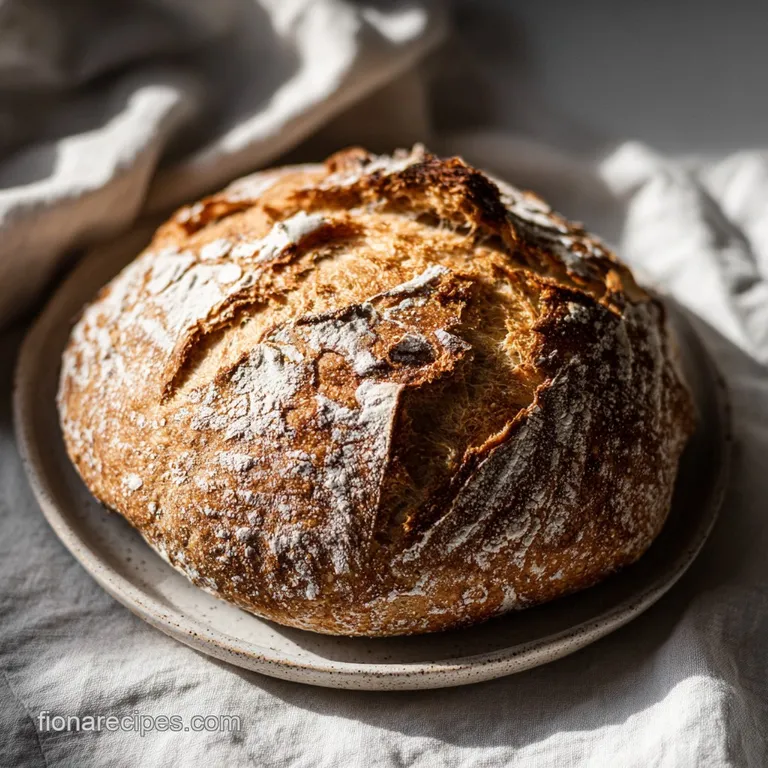
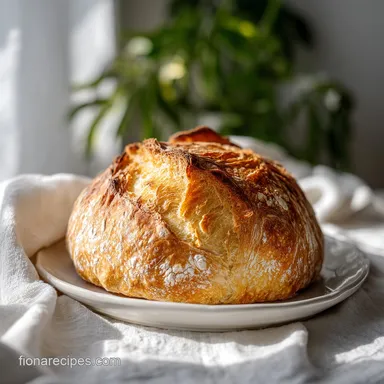
Easy No Knead Bread: Crusty and Golden
- Time: Active 15 minutes, Passive 18 hours 45 mins, Total 19 hours
- Flavor/Texture Hook: Shatter crisp mahogany crust with a chewy, honeycombed interior
- Perfect for: Weekend mornings, beginner bakers, and low effort meal prep
- The Science Behind Easy No Knead Bread
- Why Long Fermentation Builds Flavor
- Precise Components for Optimal Structure
- Gathering Your Essentials and Substitutes
- Essential Gear for Better Crusts
- Mastering the Simple Baking Steps
- Troubleshooting Common Loaf Failures
- Adjusting the Recipe Volume
- Debunking Bread Making Fables
- Storage and Sustainable Leftover Ideas
- Best Ways to Enjoy Your Bread
- Recipe FAQs
- 📝 Recipe Card
The Science Behind Easy No Knead Bread
You know that sound? The one where you pull a loaf out of the oven and it actually "sings" as it cools? It is a series of tiny crackles and pops that tell you the crust is perfectly tensioned and the moisture is escaping just right.
I remember the first time I heard it; I was standing in my kitchen at 7:00 AM, coffee in hand, staring at this rustic mahogany boule that looked like it cost twelve dollars at a boutique bakery. I didn't spend three hours kneading it or ruin my wrist trying to develop the gluten.
I just let physics do the heavy lifting while I slept.
This recipe is built on the reality that time is a more efficient gluten developer than human hands. When you hydrate flour and let it sit for 18 hours 15 mins, enzymes in the flour go to work breaking down proteins and creating a strong, elastic network naturally.
It is a foolproof way to get that open, airy crumb without the stress of traditional bread making. We are going to use a Dutch oven to trap steam, which is the secret to getting a crust that is truly shatter crisp rather than just tough and dry.
I used to think that making great bread required a expensive stand mixer and years of practice. I was wrong. The secret isn't in the equipment or the muscle; it is in the hydration and the patience. This simple no knead bread recipe is going to change how you think about your kitchen routine.
You will find that the most difficult part of this entire process is simply waiting for the clock to run down while the yeast does its beautiful, bubbly work in the corner of your counter.
Why Long Fermentation Builds Flavor
The magic of this easy no knead bread lies in the biological processes that occur during the long rest period. When we talk about "no knead" methods, we are actually talking about autolysis and slow fermentation working in tandem to create a superior product.
- Time Induced Gluten Development: In a high hydration environment (350ml water to 375g flour), the protein molecules move more freely. Over 18 hours, they naturally align into long, strong chains without the need for mechanical agitation.
- Enzymatic Breakdown: Amylase enzymes in the flour break down complex starches into simple sugars. This provides fuel for the yeast and contributes to the deep mahogany color of the crust through the Maillard reaction.
- Organic Acid Production: As the yeast slowly ferments the dough, it produces organic acids and esters. These compounds are responsible for the complex, slightly tangy aroma that defines artisan crusty no knead bread.
- The Steam Chamber Effect: Baking inside a preheated Dutch oven creates a micro environment where the moisture from the dough is trapped. This keeps the surface of the loaf supple during the initial rise (oven spring), allowing for maximum expansion before the crust sets.
| Method | Total Time | Crust Texture | Effort Level |
|---|---|---|---|
| Dutch Oven (Oven) | 19 hours | Shatter crisp, thick | Very Low |
| Baking Sheet (Oven) | 19 hours | Thin, softer crust | Very Low |
| Cast Iron Skillet | 19 hours | Very crunchy bottom | Moderate |
The difference between using a Dutch oven and a standard baking sheet is mostly about the steam. Without a lid to trap the moisture, the crust sets too quickly, preventing the bread from reaching its full volume. Using a sealed vessel is the most reliable way to achieve that professional look and texture at home.
Precise Components for Optimal Structure
To understand why this simple no knead bread recipe works, we have to look at the chemistry of the four basic ingredients. Each one has a specific scientific role that dictates the final crumb and crust.
| Ingredient | Science Role | Pro Secret |
|---|---|---|
| All purpose flour | Protein Structure | Use a flour with at least 11% protein for better lift. |
| Active dry yeast | CO2 Production | A tiny amount (1g) prevents over proofing during the 18 hour rest. |
| Fine sea salt | Fermentation Control | Salt tightens the gluten network and prevents the yeast from working too fast. |
When these ingredients combine, they start a chain reaction. The water hydrates the flour, waking up the dormant yeast and beginning the process of proteolysis. Because we are using such a small amount of yeast (only 0.25 tsp), the fermentation is slow and steady, which prevents the dough from collapsing under its own weight before it hits the oven.
Gathering Your Essentials and Substitutes
Success in baking starts with the right materials. For this easy homemade bread recipe, we are using standard pantry staples, but the quality of your water and flour can subtly shift the final result.
- All purpose flour (375g / 3 cups): Provides the protein needed for structure.
- Substitute: Bread flour. Why this? It has higher protein, resulting in a chewier, taller loaf.
- Lukewarm water (350ml / 1.5 cups): Hydrates the flour and activates the yeast at 100°F.
- Substitute: Filtered water. Why this? Chlorine in tap water can sometimes inhibit yeast activity.
- Fine sea salt (8g / 1.25 tsp): Enhances flavor and regulates yeast growth.
- Substitute: Kosher salt (use 1.5 tsp). Why this? Kosher salt has larger crystals and is less dense.
- Active dry yeast (1g / 0.25 tsp): The biological leavening agent.
- Substitute: Instant yeast. Why this? It can be mixed directly without proofing, though the timing remains the same.
Chef's Tip: If you want to see if your yeast is still alive, mix it with a tablespoon of the lukewarm water and a pinch of sugar. If it doesn't foam within 5 minutes, toss it and buy a fresh jar.
Essential Gear for Better Crusts
While this is an easy bread recipe for beginners, having the right equipment ensures the science works in your favor. You do not need a lot of gadgets, but a few specific items are non negotiable for that "shatter" texture.
- 4 to 6 quart Dutch Oven: This is your most important tool. A heavy cast iron pot (like a Lodge or Le Creuset) retains heat and traps the steam released by the dough.
- Large Mixing Bowl: You need enough space for the dough to double in size. Glass or ceramic is preferred as it holds a stable temperature.
- Parchment Paper: Essential for transferring the sticky dough into a screaming hot pot without burning yourself or deflating the loaf.
- Digital Scale: While volume measurements (cups) are provided, weighing your flour (375g) is the only way to ensure the hydration ratio is exactly what it needs to be.
- Wooden Spoon or Bench Scraper: The dough is shaggy and sticky; these tools make handling it much easier than using your hands.
For a different texture profile, you might eventually want to experiment with other baking projects. If you find yourself enjoying the precision of measuring by weight, you might also like the balance of my Soft Chocolate Chip Cookies, which rely on similar moisture ratio principles.
Mastering the Simple Baking Steps

- Whisk dry ingredients. Combine 375g all purpose flour, 8g fine sea salt, and 1g active dry yeast in your large bowl. Note: Distributing the yeast evenly ensures no "hot spots" of fermentation.
- Add lukewarm water. Pour 350ml water (100°F) into the bowl and stir with a wooden spoon. until no dry streaks remain and a shaggy, sticky dough forms.
- Initiate long ferment. Cover the bowl tightly with plastic wrap to prevent the surface from drying out. Let it sit at room temperature (70°F) for 12 to 18 hours. until the surface is dotted with bubbles.
- Preheat the vessel. Place your empty Dutch oven and lid into the oven. Preheat to 450°F (230°C) for at least 30 minutes. until the pot is radiating intense heat.
- Shape the dough. Turn the sticky dough onto a piece of parchment paper. Use floured hands to fold the edges toward the center, forming a rough ball.
- Transfer carefully. Lift the parchment paper by the corners and lower it into the preheated Dutch oven. until the dough is centered in the pot.
- First stage bake. Cover with the lid immediately to trap the steam. Bake for 30 minutes. until the internal structure is set.
- Second stage bake. Remove the lid carefully. Continue baking for 12-15 minutes. until the crust is deep mahogany and the internal temperature is 210°F.
- The cooling phase. Remove the bread from the pot and place it on a wire rack. Let it cool for at least 1 hour. until the interior starch has finished setting.
Troubleshooting Common Loaf Failures
Even with a foolproof method, biological variables like humidity and temperature can affect your easy no knead bread. Understanding the root cause of a problem allows you to adjust your technique for the next batch.
Correcting Excessive Dough Stickiness
If your dough feels more like a liquid batter than a shaggy mass, your hydration might be too high for the brand of flour you are using. Different flours absorb water at different rates based on their protein content and how they were milled.
| Problem | Root Cause | Solution |
|---|---|---|
| Dough is too wet | Excess water or low protein flour | Add 1 tbsp flour at a time until shaggy. |
| No bubbles after 18h | Dead yeast or cold room | Move to a warmer spot; check yeast freshness. |
| Burnt bottom crust | Direct heat from bottom rack | Place a baking sheet on the rack below the pot. |
Addressing Poor Rise Problems
A "flat" loaf usually happens because the yeast didn't produce enough gas or the gluten wasn't strong enough to hold it. Make sure your water wasn't too hot (over 110°F), as that will kill the yeast instantly.
Also, ensure your Dutch oven was preheated for the full 30 minutes; a cold pot will not give the dough the "thermal shock" it needs to expand quickly.
Common Mistakes Checklist
- ✓ Never skip the preheating of the Dutch oven (it is essential for oven spring).
- ✓ Don't peek! Opening the lid during the first 30 minutes lets the steam escape.
- ✓ Always use a wire rack for cooling (prevents a soggy bottom).
- ✓ Resist the urge to cut the bread while it is hot (the steam inside is still "cooking" the crumb).
- ✓ Ensure your plastic wrap is airtight during the long rest to avoid a dry skin forming.
Adjusting the Recipe Volume
Scaling a high hydration dough like this requires a few tweaks to the timing and the liquid ratios to ensure the results remain consistent.
- Reducing the batch (1/2 size): Use a smaller 2 quart Dutch oven. Reduce the baking time by about 20%, but keep the oven temperature at 450°F. Ensure the internal temperature still reaches 210°F.
- Increasing the batch (2x size): If you double the ingredients, do not try to bake it as one massive loaf. It will likely be raw in the middle and burnt on the outside. Instead, divide the dough into two separate bowls for fermentation and bake them sequentially or in two separate pots.
- Baking at altitude: If you are above 3,000 feet, your bread will rise faster. Reduce the yeast by about 15% and check the loaf 10 minutes earlier than the recipe suggests.
When you are experimenting with different dough volumes, it is helpful to understand how hydration affects texture. This is similar to the moisture balance found in Healthy Banana Bread Muffins, where the ratio of wet to dry ingredients determines the final density of the bake.
Debunking Bread Making Fables
There are many misconceptions about what makes a "good" loaf of bread. Let's clear up some of the most common myths associated with the no knead method.
- Myth: You must use bread flour for a good rise. While bread flour has more protein, all purpose flour is perfectly capable of producing a beautiful, airy loaf in a no knead environment because the long fermentation builds the necessary strength.
- Myth: More yeast means a better rise. Actually, too much yeast in a long ferment recipe will cause the dough to over proof and collapse. The 1g (0.25 tsp) used here is specifically calculated to work over 18 hours.
- Myth: Cutting the bread hot is fine. This is a tough one to follow, but cutting hot bread releases the steam too quickly, which can turn the interior gummy and cause the loaf to go stale within hours.
Storage and Sustainable Leftover Ideas
Once you have mastered the 2 hour no knead bread (active time!) process, you need to know how to keep it fresh. Because this bread has no preservatives, its shelf life is shorter than store-bought options.
- Storage: Store the cooled loaf in a paper bag at room temperature for up to 2 days. For longer storage, slice the bread and freeze it in an airtight bag for up to 3 months. Avoid the refrigerator, as it actually accelerates the staling process through starch retrogradation.
- Reheating: To regain the "shatter" crust, place a slice in the toaster or put the whole loaf back in a 350°F oven for 5-8 minutes.
- Zero Waste: Don't throw away stale ends. The high hydration crumb makes incredible croutons or "Panzanella" salad. You can also pulse dried pieces into high-quality breadcrumbs that beat anything you can buy in a canister. Even the flour dust left in the bowl can be composted or used to "season" your proofing baskets for the next batch.
Best Ways to Enjoy Your Bread
This crusty no knead bread is a blank canvas. While it is incredible with just a thick slab of salted butter, its sturdy structure makes it perfect for more involved pairings.
The chewy crumb holds up beautifully to wet ingredients, making it the ultimate choice for bruschetta or avocado toast. If you have leftovers that have gone slightly firm, use them for French toast; the large holes in the crumb will soak up the custard without the bread falling apart.
If you are looking for a full meal pairing, this loaf is the natural companion to hearty soups or stews. The thick crust is designed for dipping, and the slight acidity of the long fermentation balances out rich, fatty flavors.
It truly is the "utility player" of the kitchen simple to make, but sophisticated enough for any dinner party.

Recipe FAQs
Is it true I need to knead the dough to get a good rise?
No, this is a common misconception. The long 12 to 18-hour fermentation time allows the yeast to develop the gluten structure naturally without any physical kneading required.
How to handle the dough if it feels too sticky to work with?
Use extra flour on your hands and the parchment paper. Keep your movements quick and gentle so the shaggy dough stays intact while you fold the edges toward the center to form your ball.
Can I store this bread in the refrigerator to keep it fresh longer?
No, the refrigerator will accelerate staling. Cold temperatures cause starch retrogradation, which makes the crumb go stale much faster than keeping it at room temperature in a paper bag.
How to achieve that deep mahogany crust?
Bake with the lid off for the final 12-15 minutes at 450°F. This direct exposure to the high heat is essential for caramelizing the crust to that signature color and crunch.
Why is my bread not airy despite following the 18-hour proof?
Check your room temperature, as it should be approximately 70°F. If your kitchen is colder, the yeast activity slows down; if you enjoyed the patience required to master this slow rise technique, you might appreciate the precision needed for our classic meatloaf recipe.
How to tell when the loaf is perfectly baked?
Measure the internal temperature to ensure it reaches 210°F. At this point, the crumb is fully set and the crust will have the desired shatteringly crisp texture.
How to reheat slices to bring back the original crustiness?
Pop the slices into a hot oven or toaster. Direct heat is the only way to re-crisp the crust after the bread has been stored, as microwave reheating will only make the bread soft and chewy.
Easy No Knead Bread
Ingredients:
Instructions:
Nutrition Facts:
| Calories | 114 kcal |
|---|---|
| Protein | 3.2 g |
| Fat | 0.3 g |
| Carbs | 23.8 g |
| Fiber | 0.8 g |
| Sugar | 0.1 g |
| Sodium | 259 mg |
