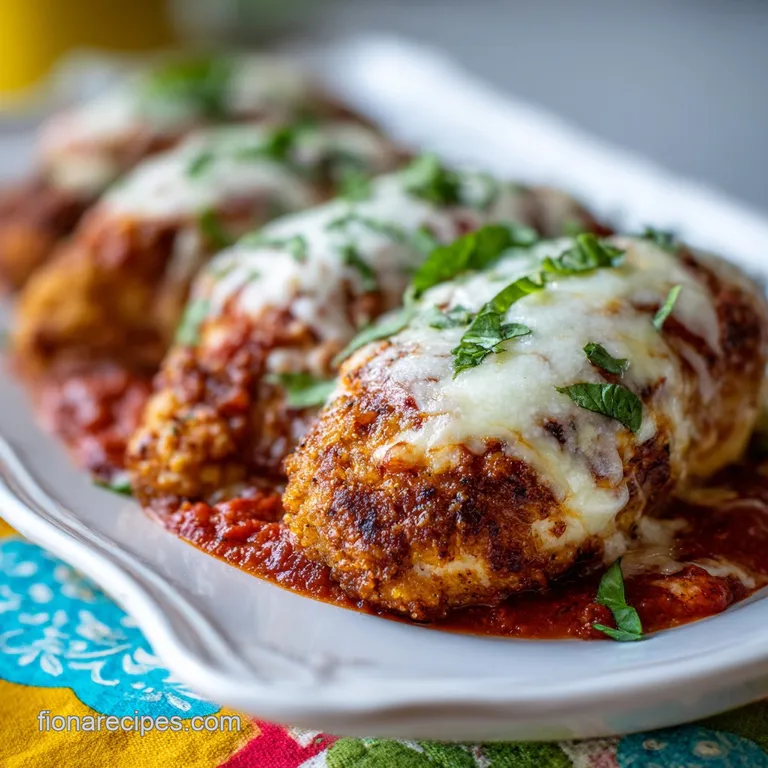
Chicken Parmesan: Crispy and Golden
- Time: Active 20 minutes, Passive 20 minutes, Total 40 minutes
- Flavor/Texture Hook: A shattering panko crust paired with velvety fresh mozzarella and bright basil.
- Perfect for: A stress free family dinner that feels like a weekend treat.
- Mastering the Golden Crunch Chicken Parmesan Recipe
- Why This Specific Method Succeeds
- Essential Recipe Metrics and Timing
- Selecting the Best Quality Ingredients
- Minimal Tools for Maximum Flavor
- Stepping Through the Cooking Stages
- Navigating Common Kitchen Hurdles Easily
- Flavor Variations and Smart Substitutions
- Storing Leftovers for Best Results
- Perfect Pairings for Family Dinners
- Critical in Sodium
- Recipe FAQs
- 📝 Recipe Card
Mastering the Golden Crunch Chicken Parmesan Recipe
Forget everything you have been told about needing a deep fryer or a complicated three hour marinara to make a decent dinner. You don't need a professional kitchen setup or a mountain of dishes to get that iconic Italian American comfort on the table.
For years, I thought the secret to a great chicken parmesan recipe was some hidden technique involving fancy oils or double frying, but it turns out the real magic is much simpler. It is all about the "thwack" of a meat mallet and five minutes of patience.
I remember one Tuesday night, the kids were circling the kitchen like hungry sharks and I was staring at two massive chicken breasts. I used to just toss them in the pan, resulting in one end being dry as a bone while the middle was still raw.
That night, I finally grabbed a heavy skillet and pounded those breasts until they were perfectly even. The sizzle that followed when they hit the oil was different more consistent, more confident. The crust didn't just brown, it transformed into a mahogany shield that protected the juicy meat inside.
This recipe is designed for the real world cook who wants a win without the stress. We are going to use panko for a superior crunch and fresh mozzarella because life is too short for the pre shredded stuff that never quite melts right.
You can expect a meal that looks like it came from a white tablecloth restaurant but fits perfectly into your weeknight rotation. We'll get that cheese bubbly and browned under the broiler, and I promise you, the sound of that first cut into the crust is the most satisfying thing you'll hear all week.
Why This Specific Method Succeeds
Thermal Momentum: Using a heavy bottomed skillet ensures the oil temperature stays stable when the cold chicken is added, preventing the breadcrumbs from soaking up grease and becoming soggy.
Structural Binding: The triple dredge station creates a layered foundation where the flour dries the surface, the egg acts as a high protein glue, and the panko parmesan mix creates a dense, interlocking lattice of crunch.
Vapor Release: Resting the breaded cutlets for five minutes before frying allows the moisture in the egg to hydrate the flour and panko, ensuring the coating stays attached to the meat rather than puffing away during cooking.
Selective Hydration: By placing the marinara only in the center of the cutlet before broiling, we preserve the crispy edges while still getting that classic saucy, cheesy bite in the middle.
| Thickness | Internal Temp | Rest Time | Visual Cue |
|---|---|---|---|
| 1/4 inch | 165°F | 5 mins | Mahogany brown crust |
| 1/2 inch | 165°F | 8 mins | Golden but less crisp |
| 3/4 inch | 165°F | 12 mins | Risk of burnt coating |
This thickness guide is your best friend in the kitchen. When the meat is an even quarter inch, it cooks so fast that the breading doesn't have time to burn before the center is done. If you're interested in more ways to use this cheesy, savory profile, you might love my Garlic Parmesan Chicken Pasta which uses similar flavors in a faster format.
Essential Recipe Metrics and Timing
To get this right every single time, we need to focus on the numbers. This isn't a "vibe based" recipe it's a precision based one that happens to be very easy. We are looking for three specific numeric checkpoints. First, the thickness of the chicken must be 1/4 inch.
Second, the oil needs to be hot enough that a breadcrumb sizzles instantly but doesn't turn black in ten seconds. Finally, we must hit an internal temperature of 165°F.
| Component | Science Role | Pro Secret |
|---|---|---|
| Panko Breadcrumbs | High surface area | Use panko over traditional crumbs for a "shatter" texture that resists moisture |
| Parmigiano Reggiano | Protein & Fat | Finely grated cheese melts into the crust, acting as a secondary binder |
| Fresh Mozzarella | Moisture Content | Slicing fresh logs provides a velvety melt that doesn't feel rubbery when cooled |
| Dried Oregano | Volatile Oils | Rubbing the herb between your palms before adding to the breading "wakes up" the flavor |
The interplay between the dry panko and the salty parmesan is what makes this crust legendary. While the panko provides the structural crunch, the parmesan adds a savory depth that balances the acidity of the marinara sauce later on.
Selecting the Best Quality Ingredients
When it comes to a chicken parmesan recipe, the ingredients are the stars, so don't hide them behind low quality shortcuts. Start with 2 large (approx. 500g) boneless, skinless chicken breasts. You'll halve these horizontally to get four manageable pieces.
For the dredging station, you'll need 0.5 cup (60g) all purpose flour. This is the base that keeps everything from sliding off.
The wet bind comes from 2 large eggs, beaten with 1 tbsp water. The water thins the egg just enough so it doesn't clump. For that signature crunch, use 1 cup (60g) panko breadcrumbs mixed with 0.5 cup (45g) finely grated Parmigiano Reggiano.
Season this mix with 1 tsp dried oregano, 0.5 tsp garlic powder, 1 tsp fine sea salt, and 0.5 tsp cracked black pepper.
For the assembly, use 1.5 cups (350ml) of your favorite marinara sauce and 8 oz (225g) fresh mozzarella cheese, sliced into thick rounds. To finish, you'll want 0.25 cup (10g) fresh basil leaves, chiffonade, and 3 tbsp neutral oil (like canola or vegetable) for the shallow fry.
| Original Ingredient | Substitute | Why It Works |
|---|---|---|
| Fresh Mozzarella | Low moisture Mozzarella | Melts faster and is saltier. Note: Less "gourmet" feel but great for kids. |
| Panko Breadcrumbs | Crushed Crackers | Provides a similar sturdy crunch with a buttery undertone. |
| Parmigiano Reggiano | Pecorino Romano | Harder, saltier sheep's milk cheese. Note: Adds a sharper, more pungent tang. |
If you find yourself with extra chicken and want a quicker lunch option, these same breading principles work wonders for a Chicken Caesar Wrap the next day. Using the right fats and binders ensures the chicken stays juicy even if you're reheating it for a different meal.
Minimal Tools for Maximum Flavor
You don't need a countertop full of gadgets to make this work. In fact, a minimalist approach usually results in a better meal because you're focused on the technique rather than the equipment. A heavy bottomed skillet, such as a cast iron or a heavy stainless steel pan, is non negotiable.
It holds the heat so you get that mahogany color without the temperature dipping.
A meat mallet is the only "specialty" tool I recommend, but even then, a heavy rolling pin or the bottom of a small saucepan works in a pinch. You also need three shallow bowls for your dredging station.
Using wide, flat containers like pie plates or square storage containers makes the coating process much less messy and ensures the chicken gets fully covered without bald spots.
Finally, a wire rack set over a baking sheet is a secret weapon. Placing the fried chicken directly onto a plate leads to a soggy bottom as the steam has nowhere to go. A wire rack allows air to circulate around the entire cutlet, keeping the crust crisp while you prep the cheese and sauce for the final broil.
Stepping Through the Cooking Stages

Place the halved chicken breasts between two sheets of plastic wrap on a sturdy cutting board. Use the flat side of a meat mallet to gently pound the meat from the center outward until it is an even 1/4 inch thick. Note: This ensures the entire piece cooks at exactly the same rate.
Set up your triple dredge station by placing the flour seasoned with salt and pepper in the first bowl, the beaten eggs and water in the second, and the panko, Parmesan, oregano, and garlic powder in the third.
Pat the chicken pieces completely dry with paper towels. Coat each piece in flour and shake off any excess, then dip thoroughly into the egg wash, and finally press firmly into the panko Parmesan mixture until fully covered and shaggy.
Let the breaded cutlets rest on a plate or rack for 5 minutes. Note: This "sets" the breading so it doesn't fall off in the pan.
Heat the 3 tbsp of neutral oil in your heavy skillet over medium high heat. Wait until the oil shimmers before adding the chicken.
Shallow fry the chicken for 3-4 minutes per side until the crust is mahogany colored and the internal temperature reaches 165°F. Work in batches if your pan isn't large enough to avoid overcrowding.
Transfer the fried cutlets to a wire rack. Spoon about 1/4 cup of marinara sauce into the center of each cutlet, leaving the edges bare. Top each with 2 oz of sliced mozzarella.
Place the rack (on its baking sheet) under the broiler on high for 2-3 minutes until the cheese is bubbly, melted, and shows a few brown spots.
Remove from the oven and immediately garnish with the fresh basil chiffonade.
Serve immediately while the cheese is molten and the crust is at its peak crunch.
Navigating Common Kitchen Hurdles Easily
Why Your Coating Is Falling Off
If your breading slides off like a loose jacket, it's usually because the chicken was too damp or you didn't let it rest. When moisture is trapped between the meat and the flour, it turns to steam during frying, pushing the crust away.
Always pat the meat bone dry and give it that 5 minute rest after dredging to let the "glue" set.
Fixing a Soggy Bottom
The number one enemy of a great parmesan recipe is the steam that collects under the chicken after it leaves the pan. If you put hot fried chicken on a flat plate, it will sweat. Use a wire rack. Also, don't drown the chicken in sauce.
By keeping the sauce in the center, you keep the perimeter crunchy, providing that essential texture contrast.
| Problem | Root Cause | Solution |
|---|---|---|
| Burnt Breading | Heat too high or too much cheese in mix | Lower heat to medium and ensure cheese is finely grated |
| Raw Middle | Chicken too thick | Pound to 1/4 inch thickness before dredging |
| Greasy Texture | Oil wasn't hot enough | Wait for oil to shimmer or bubble around a test crumb |
Common Mistakes Checklist:
- ✓ Did you pound the chicken to a uniform 1/4 inch? (Prevents dry edges and raw centers)
- ✓ Was the chicken patted dry before the flour step? (Ensures the coating actually sticks)
- ✓ Did the oil reach shimmering heat before the chicken went in? (Prevents oil absorption)
- ✓ Is the sauce restricted to the center of the cutlet? (Preserves the crispy crust edges)
- ✓ Are you using a wire rack instead of a paper towel to drain? (Prevents steam induced sogginess)
Flavor Variations and Smart Substitutions
If you want to shake things up, the beauty of this dish is its flexibility. For a spicy kick, try adding a half teaspoon of red pepper flakes to your panko mixture, or use a spicy arrabbiata sauce instead of traditional marinara.
If you're out of panko, you can use regular breadcrumbs, but I recommend pulsing them in a blender with a few crackers to get that larger crumb size that makes the texture so interesting.
For a gluten-free version, a 1 to-1 gluten-free flour blend and gluten-free panko work surprisingly well. The parmesan in the crust actually helps the gluten-free breading brown more effectively than it would on its own.
If you're looking for a lower carb option, you could even try crushed pork rinds mixed with parmesan, though the flavor will be significantly richer and meatier.
| Fresh | Shortcut | Flavor Impact |
|---|---|---|
| Homemade Marinara | Jarred Premium Sauce | Jarred is more consistent but can be sweeter. |
| Fresh Mozzarella Log | Pre shredded Bag | Pre shredded has cornstarch and doesn't melt smoothly. |
| Grating your own Parm | Canned "Green Shaker" | Canned lacks the moisture and "melt ability" of fresh. |
Chef's Tip: If you want a deeper, more complex flavor, try adding a teaspoon of nutritional yeast to your breading. It mimics the savoriness of extra cheese without adding moisture that might soften the crust.
Storing Leftovers for Best Results
Storage: You can keep leftovers in an airtight container in the fridge for up to 3-4 days. However, be warned: the crust will lose its "shatter" once it sits in the fridge with the sauce. To revive it, avoid the microwave at all costs.
Reheat in a 350°F (180°C) oven or an air fryer for 5-8 minutes until the cheese is bubbling again.
Freezing: This is a great meal to prep ahead. You can freeze the chicken after the breading step (but before frying) for up to 2-3 months. Place them on a sheet pan to freeze individually, then bag them up.
When you're ready to eat, fry them directly from frozen, adding an extra 2 minutes per side to ensure the center is cooked through.
Zero Waste: If you have leftover marinara or basil, don't let them go to waste. Use the extra sauce as a dip for the crust edges, or toss it with a bit of pasta the next day.
Leftover basil can be stored by placing the stems in a glass of water like a bouquet, which keeps it fresh for much longer than a plastic bag in the crisper drawer.
Perfect Pairings for Family Dinners
While the classic move is to serve this over a pile of spaghetti, I actually prefer a lighter side to balance the richness of the fried chicken and cheese. A simple arugula salad with a lemon olive oil dressing cuts through the fat perfectly.
The peppery bite of the greens works wonders against the sweetness of the tomato sauce.
If you are feeding a crowd that demands carbs, garlic bread is the obvious choice. Use the broiler while the chicken is resting to toast up some crusty bread with butter and garlic powder.
If you're looking for a vegetable that kids will actually eat, roasted broccoli with a squeeze of lemon and a dusting of more parmesan is always a winner.
- If you want a spicier bite, add 1/2 tsp red pepper flakes to the marinara.
- If you want a chewier crust, use Italian breadcrumbs mixed 50/50 with the panko.
- If you want a lighter meal, serve the chicken over zoodles or a bed of sautéed spinach.
No matter how you serve it, the goal is to keep that crust as crisp as possible for as long as possible. This chicken parmesan recipe isn't just about the flavor it's about the experience of that first, crunchy, cheesy bite that makes the 40 minutes of effort feel like a total triumph.
Trust the process, pound that chicken, and don't forget the fresh basil at the end!

Critical in Sodium
1140 mg 1140 mg of sodium per serving (50% 50% of daily value)
The American Heart Association recommends limiting sodium intake to about 2,300mg per day.
Tips to Reduce Sodium
-
Low-Sodium Marinara-20%
Replace the 1.5 cups (350ml) marinara sauce with a low-sodium or no-salt added version. This is a significant source of hidden sodium.
-
Reduced Sodium Cheese-15%
Use a Parmigiano Reggiano that is labeled as reduced sodium or omit it entirely. Alternatively, use a much smaller amount.
-
Reduce Added Salt-10%
Cut the 1 tsp fine sea salt in half or omit it completely. You can add more seasoning with herbs and spices.
-
Flavor Boost with Herbs & Spices
Enhance flavor using plenty of dried oregano, garlic powder, and fresh basil leaves. Consider adding other no-sodium seasonings like onion powder or paprika.
Recipe FAQs
What is the secret to good chicken Parmesan?
Pounding the chicken to an even 1/4 inch thickness. This ensures every part of the breast reaches 165°F (74°C) at the same time, preventing the edges from overcooking while waiting for the center to finish.
What is needed for chicken Parmesan?
You need chicken breasts, a triple dredge setup, and quality cheese. Specifically, you will use all-purpose flour, beaten eggs with water, panko breadcrumbs, finely grated Parmigiano Reggiano, dried oregano, garlic powder, sea salt, pepper, marinara sauce, fresh mozzarella, fresh basil, and neutral oil
for frying.
What are common mistakes when making chicken parm?
Failing to pat the chicken completely dry before dredging. Excess surface moisture prevents the flour from adhering properly, which causes the crust to detach from the meat during frying.
What is the difference between chicken parm and chicken parmigiana?
None, they are the same dish. "Chicken parm" is simply the common American shorthand for the traditional Italian American Chicken Parmigiana.
How to get the crispiest breading possible?
Let the breaded cutlets rest for 5 minutes before frying. This allows the flour and egg binder to hydrate and adhere to the chicken, creating a much stronger bond that stays crispy during the shallow fry.
How to reheat leftovers without losing the crust's texture?
Reheat in a 350°F (180°C) oven or air fryer for 5-8 minutes. Avoid the microwave at all costs, as it creates steam that turns the crispy panko coating into a soggy mess. If you enjoy mastering this kind of texture control, you might find the same logic helpful when preparing our quick chicken piccata.
Is it true the chicken must be fried in deep oil?
No, this is a common misconception. You only need to shallow fry the chicken in a heavy bottomed skillet with 3 tablespoons of neutral oil for 3-4 minutes per side to achieve the perfect mahogany colored crust.
Crispy Chicken Parmesan Recipe

Ingredients:
Instructions:
Nutrition Facts:
| Calories | 647 kcal |
|---|---|
| Protein | 64 g |
| Fat | 28 g |
| Carbs | 31 g |
| Fiber | 2.5 g |
| Sugar | 5.5 g |
| Sodium | 1140 mg |
