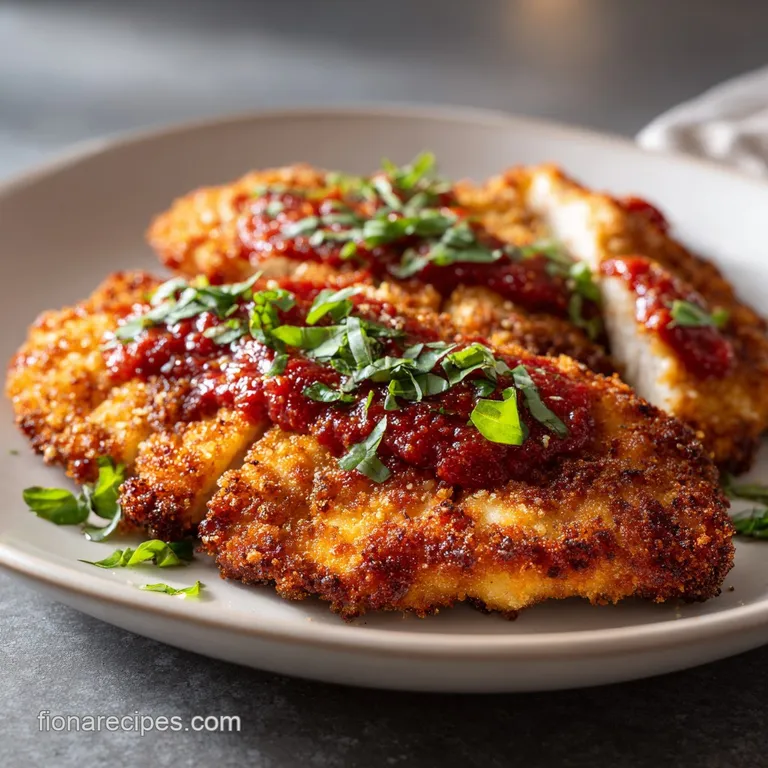
Crispy Chicken Parmesan
- Time: Active 15 minutes, Passive 15 minutes, Total 30 minutes
- Flavor/Texture Hook: Golden brown shatter crisp exterior with a silky, melted cheese finish
- Perfect for: Busy weeknight family dinners or impressive date night comfort food
- Secrets to My Favorite Easy Crispy Chicken Parmesan
- The Science Behind This Crowd Pleasing Family Favorite
- Essential Preparation Numbers for the Perfect Result
- Choosing the Best Ingredients for Maximum Flavor
- The Essential Tools for a Successful Kitchen Prep
- Master the Crispy Chicken Coating with Ease
- Solving Common Problems Before They Ruin Dinner
- Easy Ways to Customize This Classic Recipe
- Keeping Your Leftovers Fresh and Perfectly Crispy
- Side Dishes That Pair Well With This Meal
- Quick Myth Busting
- HIGH in Sodium
- Recipe FAQs
- 📝 Recipe Card
Secrets to My Favorite Easy Crispy Chicken Parmesan
The sound of a sharp knife dragging across a golden brown chicken cutlet is honestly the best part of my Friday nights. You know that specific "shatter" sound? That is exactly what we are going for here.
I remember the first time I tried making this for the kids; I followed a generic recipe and ended up with a pile of mushy breadcrumbs and chicken that felt like rubber. It was a total disaster, but it taught me one thing: the moisture in the sauce is the enemy of the crunch.
We have all been there, pulling a tray out of the oven only to find the bottom of the chicken has become a soggy sponge. I spent months tweaking the ratio of panko to cheese until I found the sweet spot.
This version uses a specific breading technique that creates a barrier, keeping the meat juicy while the outside stays firm even under a blanket of melted mozzarella. It is real food for real families, and it works every single time.
If you are looking for a meal that feels like a big warm hug but still has that satisfying professional finish, this is it. We are skipping the complicated gourmet steps and focusing on what actually makes the dish hit the mark: heat control and seasoning.
I promise you, once you hear that first bite crackle, you will never go back to the frozen stuff or the soggy takeout versions.
The Science Behind This Crowd Pleasing Family Favorite
Starch Retrogradation: Using panko instead of traditional breadcrumbs creates more surface area for the oil to crisp, preventing the coating from absorbing too much moisture from the sauce.
Protein Denaturation: Slicing the 2 large chicken breasts into thin cutlets ensures the proteins cook through rapidly at high heat, which prevents the meat from toughening up.
The Maillard Reaction: Mixing grated Parmigiano Reggiano directly into the breading allows the cheese proteins to brown alongside the panko, creating a deeper, savory umami profile.
Fat Emulsification: Adding 1 tbsp water to the 2 large eggs thins the proteins, allowing for a thinner, more even coating that sticks to the flour without clumping.
| Cooking Method | Total Time | Texture Result | Best Use Case |
|---|---|---|---|
| Stovetop Only | 12 minutes | Maximum crunch, less melty | Quick lunch for one |
| Oven Bake Only | 25 minutes | Even browning, less oil | Large batches for crowds |
| Hybrid (This Recipe) | 15 minutes | Shatter crisp crust with bubbly cheese | The gold standard dinner |
This hybrid method is the secret sauce because it gives you the direct heat sear of the pan with the gentle, all over melting power of the oven. If you find yourself craving pasta but want a lighter vibe, this technique is very similar to what I use in my Garlic Parmesan Chicken recipe, where the crust is everything.
Essential Preparation Numbers for the Perfect Result
Understanding the "why" behind the ingredients helps you become a more intuitive cook. It is not just about following steps; it is about knowing how each component behaves when it hits the heat. When we talk about Crispy Chicken Parmesan, we are looking for a balance between the acidity of the marinara and the richness of the cheese.
The Physics of the Shatter Crisp Crust
The real magic happens when the panko hits the hot oil. Because panko is "flaked" rather than ground, it has tiny air pockets that expand when heated. This creates a literal physical barrier between the moist chicken and the wet sauce.
| Component | Science Role | Pro Secret |
|---|---|---|
| Panko Breadcrumbs | Moisture barrier | Press them firmly into the meat to ensure they don't fall off in the pan |
| All Purpose Flour | Surface drier | Shake off every bit of excess; you only want a dusty film, not a paste |
| Neutral Oil | Heat conductor | Use avocado or grapeseed oil because they have a higher smoke point than olive oil |
Setting up your station is the most important part of the process. I always tell my friends to treat it like an assembly line. Once your hands get messy, you don't want to be reaching into cupboards for a forgotten spice jar.
Choosing the Best Ingredients for Maximum Flavor
- 2 large chicken breasts: Sliced into 4 thin cutlets. Why this? Thin cutlets cook fast enough to stay juicy while the breading browns.
- Substitute: Chicken thighs (pounded thin), though they take 2 minutes longer to cook.
- 0.5 cup all purpose flour: Used for the initial dredge. Why this? It creates a dry surface for the egg wash to cling to.
- Substitute: Cornstarch for an even crispier, gluten-free friendly base.
- 2 large eggs + 1 tbsp water: The binding agent. Why this? The water breaks up the egg whites for a smoother coating.
- Substitute: Heavy cream if you want a richer, thicker crust.
- 1 cup panko breadcrumbs: The crunch factor. Why this? Panko stays crispy much longer than traditional Italian breadcrumbs.
- Substitute: Crushed saltine crackers for a nostalgic, buttery twist.
- 0.5 cup grated Parmigiano Reggiano: Mixed into the breading. Why this? It adds salt and umami directly to the crust.
- Substitute: Grated Pecorino Romano for a sharper, saltier kick.
- 1 tsp garlic powder & 1 tsp dried oregano: Primary seasonings. Why this? Dried herbs hold up better to high frying temperatures than fresh ones.
- Substitute: Italian seasoning blend if you are in a hurry.
- 0.5 tsp fine sea salt: To season the flour. Why this? Fine salt distributes more evenly than coarse kosher salt here.
- 0.25 cup neutral oil: For frying. Why this? Avocado oil allows for a over high heat sear without smoking out your kitchen.
- 1.5 cups marinara sauce: The base layer. Why this? A thick sauce prevents the chicken from sliding around.
- Substitute: Crushed tomatoes with a pinch of sugar and garlic.
- 1 cup shredded low moisture mozzarella: For the melt. Why this? Low moisture cheese melts without releasing water that soggies the crust.
- Substitute: Fresh mozzarella slices (pat them very dry first!).
- 0.25 cup fresh basil: For the finish. Why this? Adds a bright, peppery aroma that cuts through the rich cheese.
The Essential Tools for a Successful Kitchen Prep
You don't need a professional kitchen, but a few specific items make this much easier. A large cast iron skillet (like a Lodge) is my top choice because it holds heat beautifully, meaning the oil temperature won't drop the second you add the chicken.
If you don't have one, any heavy bottomed stainless steel pan will work.
Avoid using a non stick pan for the searing phase if you can help it. Non stick pans don't always play well with the high heat needed to get that deep mahogany color on the panko. You also want a wire cooling rack. This is a game changer.
Resting the fried chicken on a rack instead of a paper towel lets air circulate underneath, which stops the bottom from steaming and getting soft.
Master the Crispy Chicken Coating with Ease
- Prep the chicken. Slice the 2 chicken breasts horizontally to create 4 even cutlets. Note: If they are uneven, place them between plastic wrap and gently pound them to a uniform 1/2 inch thickness.
- Set up the stations. Place the flour in the first bowl, the 2 beaten eggs and water in the second, and the panko, Parmesan, garlic powder, oregano, and salt in the third.
- Dredge the cutlets. Coat one cutlet in flour and shake off the excess until only a fine dust remains.
- Apply the binder. Dip the floured chicken into the egg mixture until completely submerged and coated.
- Press the breading. Move the chicken to the panko mixture and press firmly until the breading forms a thick, even shell.
- Heat the oil. Add 0.25 cup oil to your skillet over medium high heat until the oil shimmers and a breadcrumb sizzles instantly.
- Sear the chicken. Place cutlets in the pan and cook for 3-4 minutes per side until the crust is a deep golden brown and rigid.
- Layer the flavors. Spread a thin layer of marinara in a baking dish, place the chicken on top, and spoon a little more sauce only in the center of each cutlet.
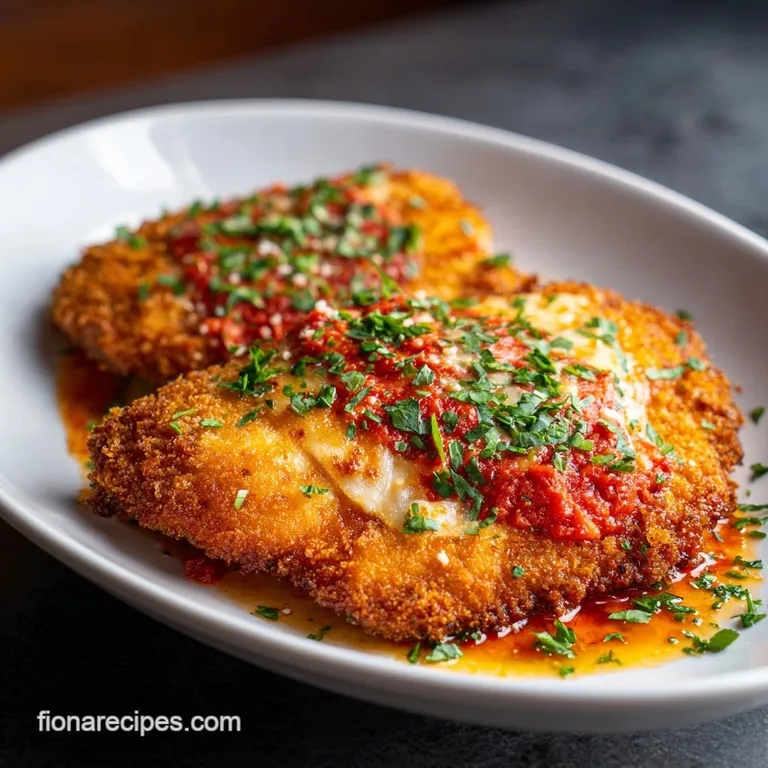
- Add the cheese. Top each piece with the shredded mozzarella and a dusting of extra Parmesan.
- Broil the top. Place under the broiler for 2-3 minutes until the cheese is bubbly and spotted with brown. Finish with fresh basil.
Chef's Tip: Freeze your block of mozzarella for 10 minutes before grating. This makes it much easier to shred and prevents it from clumping into a ball.
Solving Common Problems Before They Ruin Dinner
Why Your Breading Slides Off
This usually happens because the chicken was too wet before you started, or you didn't shake off the excess flour. The flour acts as the "glue" for the egg, but too much flour creates a barrier that eventually separates from the meat.
Why Your Chicken Is Dry
Overcooking is the culprit here. Since we are using thin cutlets, they only need about 3-4 minutes per side in the pan. They will finish heating through in the oven while the cheese melts.
Use a meat thermometer if you are unsure; you are aiming for 165°F (74°C).
| Problem | Root Cause | Solution |
|---|---|---|
| Soggy Bottom | Sauce trapped under chicken | Only put a thin layer of sauce in the dish; don't drown the chicken |
| Burnt Breading | Oil too hot or too little oil | Use enough oil to reach halfway up the chicken and keep heat at medium high |
| Cheese not melting | Oven rack too low | Move the rack to the top third of the oven for the broiling step |
Common Mistakes Checklist
- ✓ Pat the chicken completely dry with paper towels before dredging in flour.
- ✓ Don't overcrowd the pan; if the cutlets touch, they will steam instead of fry.
- ✓ Wait for the oil to be truly hot; cold oil will soak into the breading and make it greasy.
- ✓ Let the chicken rest for 2 minutes on a wire rack before adding the sauce and cheese.
Easy Ways to Customize This Classic Recipe
If you want to scale this down for two people, just use one large breast and halve the breading ingredients. For the egg, beat one egg and only use half of it to avoid waste. When scaling up for a party of eight, I recommend working in batches for the frying. Don't try to cram eight cutlets into one pan!
You can keep the first batch warm on a wire rack in a 200°F (95°C) oven while you finish the rest.
1. Air Fryer Crispy Chicken Parmesan
If you want to save on oil, spray the breaded cutlets generously with cooking spray. Air fry at 400°F (200°C) for 6 minutes per side. It won't have that deep pan-fried richness, but it is incredibly crunchy and much faster for a quick lunch.
2. The gluten-free Swap
| Original Ingredient | Substitute | Why It Works |
|---|---|---|
| All Purpose Flour | Almond Flour | Provides a nutty base that browns well. |
| Panko Breadcrumbs | Crushed Pork Rinds | Extremely crispy and zero carbs. Note: Adds a distinct savory flavor. |
| Marinara Sauce | Pesto | A fresh, herby alternative for those avoiding nightshades. |
Keeping Your Leftovers Fresh and Perfectly Crispy
Store any leftovers in an airtight container in the fridge for up to 3 days. Whatever you do, please avoid the microwave for reheating! It will turn that beautiful crust into a rubbery mess.
Instead, pop the chicken into a toaster oven or a regular oven at 350°F (180°C) for about 10 minutes. This helps the crust "re crisp" while heating the chicken through.
For zero waste, don't toss those leftover breading scraps. If you have extra egg and panko, mix them together with a little more cheese and fry them up as "chef's treats" little savory fritters that the kids (and you) will love. If you have leftover marinara, it is the perfect base for a quick Chicken Salad Recipe the next day.
Side Dishes That Pair Well With This Meal
The classic choice is always a pile of spaghetti tossed in the remaining marinara, but if you want something a bit fresher, a crisp arugula salad with a lemon vinaigrette cuts through the cheese perfectly. The bitterness of the greens is a great foil for the savory breading.
Another great option is roasted broccoli or sautéed garlicky spinach. If you are feeling extra hungry, garlic bread is never a bad idea. I love using the extra Parmesan and garlic powder from this recipe to top some toasted sourdough.
It makes the whole kitchen smell like a dream and rounds out the meal in the most comforting way possible.
Quick Myth Busting
"You must deep fry for it to be crispy." This is simply not true. Shallow frying in 1/4 cup of oil provides plenty of heat contact to crisp the panko without the mess of a deep fryer. The key is the panko itself, not the volume of oil.
"Fresh mozzarella is always better." While I love fresh mozzarella, it has a very high water content. Unless you slice it and let it drain on paper towels for 30 minutes, it will dump water onto your chicken and ruin the crunch.
Low moisture shredded mozzarella is actually the "pro" choice for a consistent, golden melt.
"Searing the chicken 'seals in' the juices." This is a kitchen myth. Searing is entirely about the Maillard reaction creating flavor and texture. The juiciness comes from not overcooking the meat once it hits the oven. For another great example of this technique, check out my Chicken Piccata Recipe.

HIGH in Sodium
1120 mg mg of sodium per serving (49% % of daily value)
American Heart Association recommends limiting sodium intake to approximately 2,300mg per day.
Tips to Reduce Sodium in Your Chicken Parmesan
-
Reduce Parmesan-20%
Parmesan is a significant source of sodium. Reduce the amount of Parmigiano Reggiano to 1/4 cup (25g) and the dusting to 0.5 tbsp for a noticeable reduction.
-
Low-Sodium Marinara-20%
Use a low-sodium or no-salt added marinara sauce, or make your own from scratch. Many store-bought sauces are high in sodium.
-
Salt Control-25%
Eliminate the added sea salt entirely. Taste the dish after cooking and add a small amount of salt only if absolutely necessary.
-
Low-Sodium Cheese-15%
Choose a low-sodium or part skim mozzarella cheese. Check the nutrition label and compare brands to find the lowest sodium option.
-
Flavor Boost
Enhance the flavor with fresh herbs like basil, parsley, and oregano. Experiment with other spices like black pepper, red pepper flakes, or smoked paprika to add depth without sodium.
Recipe FAQs
How to make chicken parmesan crunchy?
Use panko breadcrumbs and shallow fry first. Panko provides superior surface area for crisping, creating a better moisture barrier than standard breadcrumbs. Follow this by finishing in a hot oven to melt the cheese without steaming the crust.
Why is my chicken parm not crispy?
The crust likely steamed instead of frying properly. This happens if the oil isn't hot enough, or if you added sauce or cheese before the crust was fully set and browned in the pan.
How to get parmesan to stick to chicken?
Mix finely grated Parmigiano Reggiano directly into the panko breadcrumbs. Ensure the cutlet is thoroughly coated in the egg wash first, as the cheese needs a sticky surface to adhere before hitting the dry breading.
Is it better to use panko or regular breadcrumbs for chicken parm?
Panko is significantly better for crispness. Regular breadcrumbs compress easily and absorb more moisture; panko flakes stay light and airy, offering a shatteringly crisp texture that holds up well against the sauce.
Should I fry or bake chicken parmesan for the best texture?
Use a hybrid method: shallow fry, then bake. Frying quickly sets the crust texture and color, while the oven finishes cooking the chicken evenly and melts the cheese without making the crust soggy.
What is the trick to preventing the bottom crust from getting soggy after baking?
Rest the fried cutlets on a wire rack before saucing. Resting allows air to circulate, preventing steam buildup. Also, only use a thin layer of sauce in the baking dish underneath the chicken.
How do I ensure the chicken cutlets are cooked through without drying out?
Slice the chicken to a uniform 1/2 inch thickness first. This ensures rapid, even cooking during the initial sear. If you master texture control here, you will find the same principle crucial for achieving perfectly tender results in our Classic Meatloaf Recipe.
Crispy Chicken Parmesan
Ingredients:
Instructions:
Nutrition Facts:
| Calories | 548 kcal |
|---|---|
| Protein | 46.5 g |
| Fat | 26.2 g |
| Carbs | 31.5 g |
| Fiber | 2.4 g |
| Sugar | 4.8 g |
| Sodium | 1120 mg |
