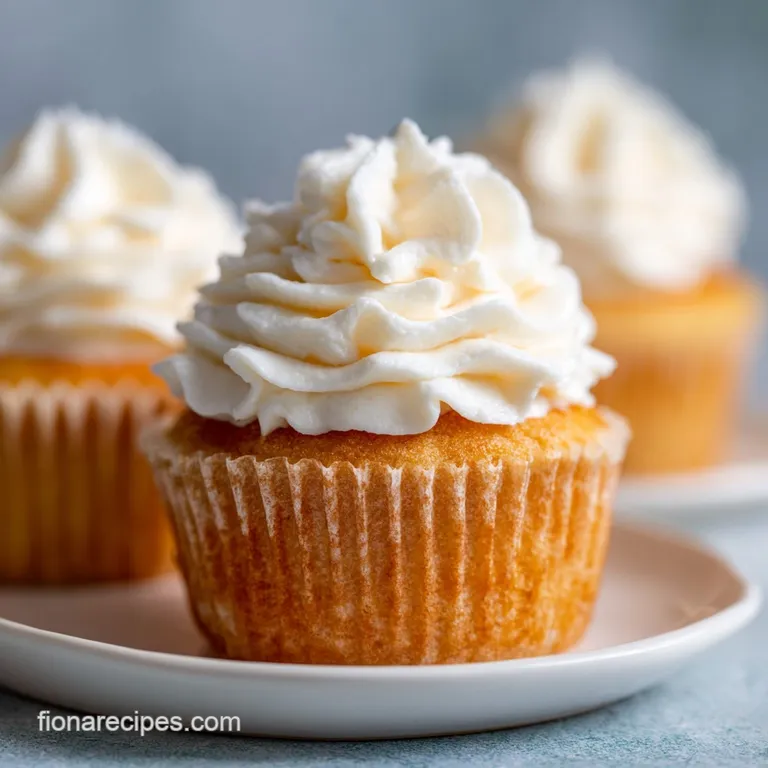
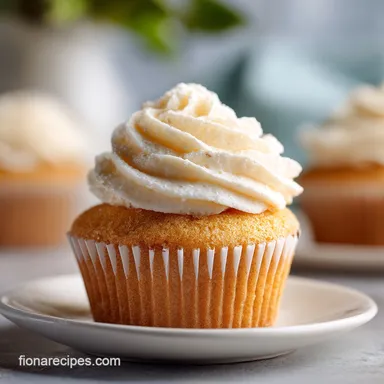
Classic Vanilla Cupcake Recipe: Velvety Texture
- Time: Active 15 minutes, Passive 20 minutes, Total 35 minutes
- Flavor/Texture Hook: Cloud like crumb with a buttery, floral vanilla finish
- Perfect for: School bake sales, birthday parties, or a cozy Sunday project
- Bake the Ultimate Classic Vanilla Cupcake Recipe
- The Science of Soft Crumbs
- Essential Ingredients and Easy Substitutes
- Essential Gear for Better Baking
- Simple Step-by-Step Baking Method
- Fixing Common Vanilla Cupcake Issues
- Simple Flavor and Size Adjustments
- Debunking Baked Good Myths
- Proper Storage and Freezing Tips
- Perfect Frosting and Topping Tips
- Recipe FAQs
- 📝 Recipe Card
Bake the Ultimate Classic Vanilla Cupcake Recipe
There is nothing quite like the scent of real vanilla and butter wafting through the house on a rainy Saturday afternoon. I remember the first time I nailed this classic vanilla cupcake recipe; I had spent months trying to move away from those dry, crumbly boxed mixes that always tasted a bit like cardboard.
When I finally pulled these out of the oven, the tops were perfectly domed, the edges were a pale golden hue, and the house smelled like a high end French patisserie.
I’ve made every mistake in the book so you don’t have to. I’ve forgotten the salt (don't do that, it’s like a song without a bass line), I’ve overmixed the batter until it turned into rubber, and I’ve even tried to frost them while they were still warm. We’ve all been there!
But once you see that "shatter" of the delicate top crust giving way to a velvety interior, you’ll never go back to any other version. This is the one that gets requested for every family birthday and school event because it’s just honestly, truly reliable.
We’re going for a specific kind of magic here. It’s about that fine, tight crumb that doesn't fall apart when you peel back the liner. It’s soft enough for a toddler but sophisticated enough for an adult dinner party.
Whether you’re a pro or this is your first time picking up a whisk, this method is designed to be stress free. Let's get into what actually makes this work so you can stop scrolling and start baking.
The Science of Soft Crumbs
- Low Protein Precision: Using cake flour instead of all purpose reduces gluten development, which ensures the crumb remains tender rather than bread like.
- Acid Base Balance: The Greek yogurt provides acidity that reacts with the baking powder, creating a massive carbon dioxide boost for a taller, lighter rise.
- Fat Coat Strategy: Cubing the butter and mixing it into the flour first coats the proteins in fat, physically blocking gluten from forming when the liquids are added.
- Emulsification Stability: Using one whole egg plus an extra egg white provides structural strength without the "heavy" sulfur taste that too many yolks can bring.
| Method Style | Prep Time | Crumb Texture | Best For |
|---|---|---|---|
| Quick Mix | 5 minutes | Coarse & Open | Last minute snacks |
| Classic Creaming | 15 minutes | Aerated & Light | Standard celebrations |
| Reverse Creaming | 12 minutes | Velvety & Dense | Professional decorating |
The choice of method really dictates the final "feel" in your mouth. While many people swear by the classic creaming of butter and sugar, I’ve found that the reverse method mixing butter into the dry ingredients creates a much more consistent, flat top that is a dream for piping frosting. If you’re looking for a quick breakfast after a late night baking session, my Fluffy Pancakes From Scratch recipe uses a similar logic with acidity to get that height.
Essential Ingredients and Easy Substitutes
| Ingredient | Science Role | Pro Secret |
|---|---|---|
| Cake Flour | Lowers gluten | Sift it twice to incorporate air for a "cloud" effect. |
| Greek Yogurt | Adds moisture/acid | Use full fat if possible to increase the velvety mouthfeel. |
| Pure Vanilla | Flavor profile | Avoid "imitation" which can turn bitter during the bake. |
| Extra Egg White | Structural lift | Provides the "leanness" needed to keep the dome from sinking. |
To Achieve a Velvety Fine Crumb
The 1.5 cups (190g) of cake flour is non negotiable for that professional finish. If you only have all purpose, you can DIY it by removing 2 tablespoons of flour and replacing them with cornstarch, but it’s never quite as silky.
The 0.75 cup (150g) of granulated cane sugar provides the sweetness, but it also helps with the browning of the edges through the Maillard reaction.
For a Healthier Moist Rise
The 0.5 cup (120g) of low-fat Greek yogurt is my secret weapon in this easy classic vanilla cupcake recipe. It provides more moisture than milk alone ever could. If you don't have yogurt, sour cream is a direct 1:1 swap that works beautifully.
The 1 tablespoon of pure vanilla extract might seem like a lot, but it’s what gives these that "expensive" flavor.
For the Lightweight Cupcake Base
Mixing the 0.5 cup (113g) of unsalted butter while it's softened and cubed ensures it distributes evenly. For those days when you need a chocolate fix alongside these vanillas, definitely try the Fudgy Brownies From recipe which also relies on high-quality fats for that signature texture.
Full Ingredient List: 1.5 cups (190g) cake flour, sifted Why this? Lower protein ensures a tender, melt in-your mouth crumb. (Substitute: 1.25 cups AP flour + 2 tbsp cornstarch) 0.75 cup (150g) granulated cane sugar Why this? Adds sweetness and
helps with moisture retention. (Substitute: Caster sugar) 1.5 tsp baking powder Why this? The primary leavening agent for a high dome. (Substitute: 0.5 tsp baking soda + 0.5 tsp cream of tartar) 0.5 tsp sea salt Why this? Balances the sugar and enhances
the vanilla. (Substitute: Table salt) 0.5 cup (113g) unsalted butter, softened and cubed Why this? Provides the "shortness" and rich buttery flavor. (Substitute: Vegan butter sticks) 1 large egg, room temperature Why this? Binds the batter and adds
richness. (Substitute: 1/4 cup applesauce) 1 large egg white, room temperature Why this? Adds protein for structure without the weight of a yolk. (Substitute: 2 tbsp aquafaba) 0.5 cup (120g) low-fat Greek yogurt Why this? Keeps the cake moist and adds a
slight tang. (Substitute: Sour cream) 1 tbsp pure vanilla extract Why this? The star of the show for flavor. (Substitute: Vanilla bean paste) Frosting Ingredients: 0.5 cup (113g) unsalted butter, 2 cups (240g) powdered sugar, 1.5 tbsp heavy cream, 1 tsp vanilla,
1 pinch salt.
Essential Gear for Better Baking
You don't need a professional kitchen to make this classic vanilla cupcake recipe from scratch, but a few specific tools make the flow much easier. A stand mixer (like a KitchenAid) is great, but a standard hand mixer works just as well for this smaller batch of 12 cupcakes.
- Standard 12 cup Muffin Tin: Use a light colored metal pan if possible. Dark pans absorb more heat and can lead to burnt bottoms.
- Paper Liners: These prevent sticking and keep the cupcakes moist while cooling.
- Sifter or Fine Mesh Strainer: Essential for the cake flour to remove lumps.
- Rubber Spatula: For that final hand fold to ensure no dry pockets remain at the bottom of the bowl.
- Digital Scale: While I've provided cup measurements, weighing your flour (190g) is the only way to guarantee the exact same result every single time.
- Piping Bag and Tips: If you want that "cloud" look for the frosting, a large round or star tip (like a Wilton 1M) is your best friend.
Chef's Tip: Freeze your butter for 10 minutes before cubing it if your kitchen is warm. This prevents the butter from melting too quickly during the mixing process, which can lead to a greasy cupcake.
Simple step-by-step Baking Method

Phase 1: The Dry to Fat Incorporation
- Preheat and Prep: Set your oven to 350°F (175°C) and line your cupcake tin. Note: A fully preheated oven is critical for that initial "burst" of rise.
- Sift the Drys: In your main bowl, sift the 1.5 cups cake flour, 0.75 cup sugar, 1.5 tsp baking powder, and 0.5 tsp salt.
- Incorporate Butter: Add the 0.5 cup cubed butter to the dry ingredients. Mix on low until the mixture looks like coarse sand. Note: This is the reverse creaming method which creates a velvety crumb.
Phase 2: Emulsifying the Liquids
- Whisk the Wet: In a separate small bowl, whisk together the 1 egg, 1 egg white, 0.5 cup Greek yogurt, and 1 tbsp vanilla.
- Combine Slowly: Add the wet mixture to the dry/butter mixture in two batches. Mix on medium speed for 60 seconds until the batter is pale and smooth.
- Scrape the Bowl: Use a spatula to scrape the bottom. You want a cohesive, thick batter that holds its shape slightly.
Phase 3: The Golden Bake
- Fill the Liners: Divide the batter evenly into the 12 liners. They should be about 2/3 full (roughly 3 tablespoons per cup).
- The Bake: Slide them into the oven for 18 to 20 minutes.
- Check for Doneness: Bake until a toothpick comes out with just a few moist crumbs. The tops should spring back when lightly touched.
- Cooling Period: Let them sit in the pan for 10 minutes, then move to a wire rack to cool completely. Note: Frosting a warm cupcake will result in a melted mess!
Phase 4: The Vanilla Frosting
- Cream the Butter: Beat the remaining 0.5 cup butter until it looks white and fluffy (about 3 minutes).
- Add Sugar: Gradually add the 2 cups powdered sugar, then the 1.5 tbsp heavy cream, 1 tsp vanilla, and a pinch of salt.
- Final Whip: Whip on high for 2 minutes until it looks like a stiff cloud. Pipe or spread onto cooled cupcakes.
Fixing Common Vanilla Cupcake Issues
Why Your Cupcakes Sank
If you pull your tray out and the centers look like craters, it’s usually one of two things: overmixing or underbaking. When you mix the batter too much after adding the eggs, you incorporate too much air. That air expands in the heat but the structure hasn't set yet, so it collapses.
Also, check your baking powder if it's older than six months, it might not have the "oomph" to hold the rise.
Why the Liners Are Peeling
This is the ultimate baker's frustration! Usually, this happens due to moisture buildup. If you leave the cupcakes in the metal tin for too long after baking, steam gets trapped between the liner and the cake, causing it to pull away.
Move them to a cooling rack exactly 10 minutes after they come out of the oven.
| Problem | Root Cause | Solution |
|---|---|---|
| Dry/Crumbly | Too much flour or overbaked | Use a scale for flour; check doneness 2 mins early. |
| Greasy Bottoms | Butter was too soft/melted | Use cool "room temp" butter (65°F). |
| Overflowing | Liners were overfilled | Only fill 2/3 full to allow room for the "dome". |
Common Mistakes Checklist:
- ✓ Ensure eggs and yogurt are at room temperature (prevents the batter from "curdling").
- ✓ Sift the cake flour - lumps will create dry white spots in your finished cake.
- ✓ Don't open the oven door during the first 15 minutes of baking.
- ✓ Use a cookie scoop for filling liners to ensure even baking across the tray.
- ✓ Test your oven temp with an external thermometer to ensure 350°F is actually 350°F.
Simple Flavor and Size Adjustments
If you need to feed a crowd, scaling this traditional vanilla cupcake recipe is fairly straightforward. For a 2x batch (24 cupcakes), double everything but keep an eye on the mixing time.
When doubling, the volume in the bowl changes how the paddle hits the batter, so you might need an extra 30 seconds of whipping to get the same aeration.
For a 1/2 batch (6 cupcakes), simply use the one whole egg and omit the extra egg white. The crumb will be slightly richer but still delicious. If you are scaling up for a wedding or large party, reduce the total salt to 1.5x rather than a full double to keep the flavor from becoming too "savory."
| Servings | Flour Amount | Pan Size | Bake Time |
|---|---|---|---|
| 12 Cupcakes | 1.5 cups | 12 cup tin | 20 minutes |
| 24 Cupcakes | 3.0 cups | Two 12 cup tins | 22 minutes (rotate pans) |
| 48 Mini | 1.5 cups | Two 24 mini tins | 12 minutes |
If you're looking for a "Decision Shortcut": If you want a whiter cupcake, use 3 egg whites and 0 whole eggs. If you want a richer cupcake, replace the yogurt with sour cream.
If you want a bakery style dome, increase the oven temp to 375°F for the first 5 minutes, then drop to 350°F.
Debunking Baked Good Myths
Myth: "The more you beat the batter, the fluffier it gets." Actually, the opposite is true for this classic vanilla cupcake recipe homemade style. Once the flour meets the wet ingredients, every second of mixing develops gluten. More gluten equals a tougher, breadier cupcake.
You want to mix only until the streaks of flour disappear and the batter is emulsified.
Myth: "Buttermilk is always better than yogurt for moisture." While buttermilk is great, it’s very thin. In a cupcake, the thickness of Greek yogurt or sour cream provides a "fat heavy" moisture that keeps the crumb tender without making the batter too runny.
It allows for a higher rise because the batter can hold the air bubbles more effectively.
Proper Storage and Freezing Tips
Storage: These cupcakes thrive at room temperature for up to 2 days in an airtight container. Because of the Greek yogurt, they stay moist longer than most. If you’ve already frosted them with the buttercream, they can stay out if your kitchen is cool, but if it's summer, pop them in the fridge.
Just remember: cold cake tastes dry! Always bring them back to room temperature for 30 minutes before eating.
Freezing: You can freeze the unfrosted bases for up to 3 months. Wrap each one individually in plastic wrap and then place them in a freezer bag. To thaw, just leave them on the counter for an hour.
Zero Waste Tip: If you happen to have a few cupcakes go stale, don't throw them away. Crumble them up, mix with a tablespoon of leftover frosting, and roll them into balls to make easy cake pops. You can also toast the crumbs and use them as a "crunch" topping for yogurt or ice cream.
Perfect Frosting and Topping Tips
The beauty of a classic vanilla cupcake is its versatility. While the vanilla buttercream included here is a "light as-air" dream, you can easily change the vibe with simple toppings. For a kid approved version, a heavy hand with rainbow sprinkles is a must.
If you’re going for a more "gourmet" look, a single fresh raspberry on top of a white swirl of frosting looks stunning.
Another trick I love is the "core and fill" method. Use a small knife or a cupcake corer to remove the center of the cooled cupcake. Fill it with lemon curd, strawberry jam, or even chocolate ganache before frosting over the top. It’s a fun surprise for anyone taking a bite.
No matter how you dress them up, the foundation of this easy classic vanilla cupcake recipe will ensure they are the star of the table. Right then, let's get that oven preheated and start baking!

Recipe FAQs
What is the ideal oven temperature for the tallest dome?
350°F (175°C) is the standard, but use a technique change for maximum height. Increase the temperature to 375°F for the initial 5 minutes, then immediately drop it back to 350°F to set the structure.
How long should the batter be mixed after adding the liquid ingredients?
Mix on medium speed for exactly 60 seconds after adding the wet mixture. Overmixing develops tough gluten, leading to a rubbery texture instead of a velvety crumb.
Is it necessary to use cake flour for this recipe?
Yes, using cake flour is highly recommended for the best texture. It has lower protein content than all-purpose flour, which physically prevents excessive gluten formation, ensuring a tender crumb.
What can I use if I don't have Greek yogurt on hand?
Use sour cream as a direct 1:1 substitution for the Greek yogurt. Both provide necessary acidity to react with the baking powder for a higher, lighter rise.
How do I prevent the cupcake liners from peeling away from the cake?
Remove the baked cupcakes from the hot metal tin after exactly 10 minutes. Trapped steam between the cake and the liner is the main cause of shrinkage and peeling.
How should I store the finished, frosted cupcakes?
Store them in an airtight container at room temperature for up to two days. If your kitchen is very warm, refrigerate them, but bring them back to room temperature for 30 minutes before serving for optimal flavor and softness.
How should I cool the finished cupcakes for the best structure?
Transfer the cupcakes to a wire rack immediately after the 10-minute resting period in the pan. Cooling completely on a rack prevents condensation from making the bottoms soggy.
Classic Vanilla Cupcakes
Ingredients:
Instructions:
Nutrition Facts:
| Calories | 339 kcal |
|---|---|
| Protein | 3.2 g |
| Fat | 16.8 g |
| Carbs | 45.8 g |
| Fiber | 0.4 g |
| Sugar | 33.1 g |
| Sodium | 188 mg |
